Cross Column

Showing posts with label Oracle JDeveloper. Show all posts

Friday, August 31, 2012

Which JVM?

When you report java.lang.OutOfMemoryError: Java heap space, you need to tell people which JVM has thrown the exception.  Sometimes this can be obvious and sometimes it isn't (see below).

An OutOfMemoryError does not necessarily imply a memory leak. The issue might simply be a configuration issue, for example if the specified heap size (or the default size if not specified) is insufficient for the application[1].  In that case, you need to figure out which configuration file to modify.

jps Command

You can use jps (Java Virtual Machine Process Status Tool) to list all local VM identifiers of instrumented HotSpot Java Virtual Machines (JVMs) on the target Linux system.  For example, on my system, it lists:

$ jps 
17291 Server
17468 Jps
7883 Launcher

This list includes one Integrated WebLogic Server (i.e., Server) and one JDeveloper (i.e., Launcher). Note that JDeveloper and Integrated WLS use their own JVM's. So, if you're running Integrated WLS from JDeveloper, you need to know which JVM has thrown the OutOfMemoryError exception.

Configuration Files


Each application uses its own configuration file to start its JVM and you need to know where to find it.

For example, to change heap space sizes, you can modify those parameters in:
  • JDeveloper
    • $JDEV_HOME/jdev/bin/jdev.conf
    • or 'which jdev' and find its containing directory; jdev.conf should be located in the same directory 
    • Note that jdev.conf includes ide.conf which contains the following configurations:
      • AddVMOption  -Xmx640M
      • AddVMOption  -Xms128M
  • WebLogic Server
    • You have two options:
      • Modify MEM_ARGS in the setDomainEnv.sh
      • $setenv USER_MEM_ARGS "-Xms512m -Xmx1024m -XX:MaxPermSize=1024m -XX:CompileThreshold=8000"
        • This will override the settings from WLS scripts as shown below:
          • if [ "${USER_MEM_ARGS}" != "" ] ; then
            MEM_ARGS="${USER_MEM_ARGS}"
            export MEM_ARGS
            fi
    • If this is Integrated WLS, your script folder is located under:
      • ../system11.1.1.6.38.61.92/DefaultDomain/bin
      • On JDev 12c, the heap size is set by the following line (which is embedded in setStartupEnv.sh):[5]
        • set SERVER_MEM_ARGS_64=-Xms1024m -Xmx3072m
          • You can trace the settings starting from startWebLogic.sh, to setDomainEnv.sh, to setSOADomainEnv.sh, and finally to setStartupEnv.sh.
  • Eclipse
    • /eclipse.ini

Project Properties


Here is another case which requires the change of project properties in JDeveloper:
  • Scenario:
    • JDeveloper is used to deploy "server-setup-seed-deploy-test" target with "Run Ant Target" and it threw "java.lang.OutOfMemoryError: PermGen space" exception.[2]
  • Solution:
    • In Jdev window, right click the project file >  Project Properties > Ant > Process > Java Options:
      • -Xms512m -Xmx1024m -XX:PermSize=512m -XX:MaxPermSize=1024m
    • Note that a new JVM is launched for the Ant process and it uses the above settings.


References

Monday, April 16, 2012

Book Review: "Oracle JDeveloper 11gR2 Cookbook"

Developing an enterprise application using SOA (i.e., Service Oriented Architecture) is a challenging  task.  With appropriate supporting technologies and tools, it can save you a lot of effort.

The core technology covered in this book is Oracle ADF.  Oracle ADF is an end-to-end Java EE framework for building rich enterprise web and mobile applications based on Java EE services and SOA.  Oracle ADF implements the "plumbing" of your application and abstracts the complexities of Java EE development.   It also takes care of areas such as:
  • Object/Relational mapping
  • Caching
  • Persistence
  • User interface framework
  • Controller layer
  • Binding of business services to user interfaces. 
Unlike other Java frameworks the development experience with Oracle ADF is visual and declarative through the JDeveloper IDE.  From the book, you can find plenty of such examples.

What's Covered?

First, the author has discussed issues that you need to address in the early design and architectural phases of the project:
  • Modularize your application
    • Break up the application in multiple workspaces
    • Divide data model into appropriate application modules
    • Avoid circular dependencies use tools such as Dependency Finder 
  • Make your application easy to extend
    • For example, allow the ability to extend the framework's base classes early on in the development process
  • Set up logging with the right logging framework
    • Choose ODL (Oracle Diagnostics Logging) for its tight integration with WebLogic and JDeveloper
  • Use page template to ensure that pages throughout the application are consistent, and provide a familiar look and feel to the end user
  • Customize the exception error message for your application
  • Use a generic backing bean actions framework to encapsulate common functionality for common JSF page actions
After laying out the foundation, the author then expand the scope of discussion vertically and horizontally. 

Vertically, the book covers different layers of the ADF's MVC architecture and various components in each layer.  Horizontally, it discusses different supporting frameworks or technologies which are used to help you create a successful end-to-end enterprise application:
  • IDE: JDeveloper
  • Integration Framework: Hudson
  • Unit Testing Framework: JUnit
  • Deployment Framework: WebLogic Server
  • Application Monitoring: JRockit Mission Control

Conclusion

This book shows you how to use Oracle JDeveloper and ADF to develop enterprise applications using SOA.

In roughly 400 pages, it tries to cover topics that are usually covered by large volumes of documentation from the following areas:
However, the author has done a good job of presenting a complex subject in a coherent and easy-to-read manner.  He has also provides many useful recipes which can be eventually incorporated into your application implementations.  Overall, it provides a useful reference for all developers starting enterprise application development with Oracle ADF.

Besides the book, the author also writes on his blogs JDeveloper Frequently Asked Questions  and ADF Code Bits.

Reviewed Book


Tuesday, April 3, 2012

Configuring JDeveloper with a Different JDK

In JDeveloper, you can change the JDK version (for example, changing from 32-bit to 64-bit) that the IDE uses or the project uses easily.  But, don't be confused with which is which.  In this article, we will introduce you how to do both.

Java SE Definitons

JDeveloper uses Java SE definitions to describe an installed Java SE environment. This environment can be either a JRE or an SDK.

Note that if you are using a JRE, some features may not be available. Every JDeveloper project uses a Java SE definition to determine what version of the Java API to compile and run with.

Changing JDK That IDE Uses

To change JDK that IDE uses, you can do this:
  • Configuring JDeveloper via the SetJavaHome configuration parameter in the jdev.conf.
Noted that directive SetJavaHome is not required by default, except for the base install, since the launcher will determine the JAVA_HOME.  On Windows it looks in ..\..\jdk, on UNIX it first looks in ../../jdk. If no JDK is found there, it looks in the PATH.

JDeveloper creates a Java SE definition for the Java SE environment being used to run JDeveloper. By default, this definition is used by all new projects. However, additional definitions can be created from any available Java SE. These new definitions can be created in either the user libraries or the system libraries. In a multiuser environment, Java SE definitions created in the user libraries are user specific, while ones created in the system libraries are shared by all users.

To create a new Java SE definition, you follow these steps:

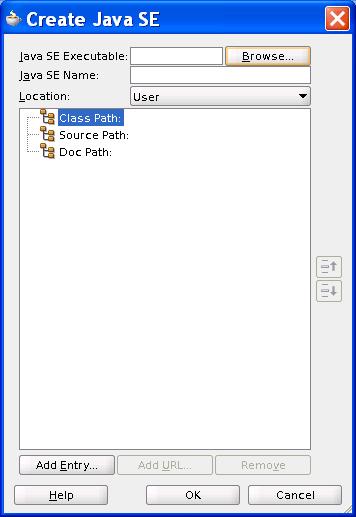
Tools > Manage Libraries > Java SE Definition > New
This will bring up a Create Java SE dialog:
Each Java SE definition encapsulates:
  • a Java executable—used for launching programs
  • a classpath—containing the classes available within the Java SE environment
  • a source path—containing the source files associated with the Java SE classes
  • a doc path—containing the Javadoc files for the Java SE classes
From now on, JDeveloper will use the new JDK for its operation.   For existing projects, we need to make sure it uses the new JDK.

Changing JDK That Project Uses

Setting the target Java SE specifies which Java SE JDeveloper will use when compiling and running your project.

To view or change the current Java SE for an individual project:
  1. In the Application Navigator, select the appropriate project.
  2. From the main menu, choose Application > Project Properties, or right-click and choose Project Properties.  The Project Properties dialog opens with the common input paths displayed or on the last page that you viewed.
  3. On the Libraries and Classpath page the Java SE Version used for the project is displayed. Click Change to define a new Java SE.
  4. When finished, click OK.


Also Consider...

When you run the Integrated WebLogic[3] for the first time in the JDeveloper, the
  • .jdeveloper/system11.1.1.x.xx.xx.xx/DefaultDomain/bin/startWebLogic.sh
script will be created.  Associated with that, the setDomainEnv.sh script will be created in the same directory.  So, if you do want to change the JDK location, you may want to change this file as well.

Finally, JDeveloper enables you to manage libraries and Java SEs outside the project scope too.  To learn more, read [4].

References

  1.  JDeveloperWorking with Applications and Projects
  2. Oracle JDeveloper 11gR2 Cookbook by Nick Haralabidis
  3. Integrated WebLogic Server (WLS)
  4. Managing Libraries and Java SEs Outside the Project Scope 
  5. What operating systems and JDK's are supported for the JDeveloper IDE?

Wednesday, January 4, 2012

Starting the CPU Profiler in JDeveloper

JDeveloper offers two kinds of profilers: The CPU Profiler and the Memory Profiler, for local as well as remote profiling.
  • CPU Profiling enables you to identify the most expensive methods and threads in your program.
  • Memory profiling helps you to find out how your program is using the Java heap.
In this article, we will show you how to:
  • Set Options for the CPU Profiler
  • Start the CPU Profiler
CPU Profiler

The CPU Profiler tabulates and displays statistical data on the performance of your application. It enables you to profile your code in one of two modes:
  • Sample CPU Time
  • Method Call Count
In Figure 1, it shows the result of method call count operation.


Figure 1. Hotspots view of the method call count operation


Figure 2. Call Stacks view of the method call count operation

The CPU Profiler displays data in two views:
  • Hotspots
  • Call Stacks
Also, depending on the mode of operation, they display different information.

In the method call count operation, these views show:
  • Hotspots
    • all the methods and the number of times they were called (see Figure 1)
  • Call Stacks
    • the Java platform methods called, sorted by thread group (see Figure 2)
In the time sampling mode of operation, these views show:
  • Hotspots
    • all Java platform methods and all methods they call, sorted by time usage
    • the cumulative amount of CPU time spent in each method
  • Call Stacks
    • the Java platform methods called in their call hierarchy

Setting Options for the CPU Profiler

You can specify if you want the Profiler to sample CPU time usage by your application, or to count method calls. Note that you can choose one mode at a time, not both.

To set CPU Profiler options:
  • In the navigator, double-click the project you want to profile to open the Project Properties dialog.
  • Click Run/Debug/Profiler to open the Project Properties - Run/Debug/Profile page.
  • Click Edit.
  • In the Edit Run Configuration dialog, set the options as desired on the Tool Settings - Profiler - CPU page. You can specify if you want the profiler to sample CPU time or count method calls. In Figure 3, we want the profiler to count method calls.
  • When finished, click OK to close the Edit Run Configuration dialog.

Figure 3. Edit Run Configuration Dialog

Starting the CPU Profile
r

Starting a CPU profiling session will automatically run your program. Once the CPU profiler window is open (see Figure 1), you can begin a use case to profile your application.

To start the CPU Profiler:
  1. In the navigator, select the project you want to profile. For example, OsmPublicUi.
  2. From the main menu, choose Run > CPU Profile OsmPublicUi.jpr.
  3. The CPU Profiler opens and runs your application.
  4. Click the Begin Use Case icon to begin a profiling

Figure 4. Starting the CPU Profiler
More Hints

If no default run target is specified in the Launch Settings page of the Edit Run Configuration dialog (Application menu > Project Properties > Run/Debug/Profile), the Choose Default Run Target dialog opens. Use this dialog to specify the default run target.

If you want to profile your application immediately when the profiler is launched, select the Begin Use Case on Application Startup checkbox in Profiler page of Edit Run Configuration dialog (see Figure 5).

If you want to analyze a specific method or class you might be interested in, enter the name of a particular method or class in your application in Method Filter (see Figure 5) at the options setting step.


References
  1. Oracle® Fusion Middleware User's Guide for Oracle JDeveloper 11g Release 2 (11.1.2.0.0) Profiling a Project

Tuesday, July 26, 2011

Beautifying Table and Column Comments for Design Review

Data model design is an iterative process. As soon as the conceptual data model is accepted by the functional team, development of logical data model gets started. Once logical data model is completed, it is then forwarded to functional teams for review. A good data model is created by clearly thinking about the current and future business requirements.

To facilitate the review process, you need to present descriptions of entities and attributes in the data model to the functional team. Some database developers prefer working at source level (i.e., SQL DDL). For example, you can present the following EMP table to the team for review:
-- Employee Data
CREATE TABLE "SCOTT"."EMP"
(
"EMPNO" NUMBER(4,0),        -- employee number
"ENAME" VARCHAR2(10 BYTE),  -- employee name
"JOB"   VARCHAR2(9 BYTE),   -- job description
"MGR"   NUMBER(4,0),        -- manager ID
"HIREDATE" DATE,            -- hiring date
"SAL"    NUMBER(7,2),       -- salary
"COMM"   NUMBER(7,2),       -- commission
"DEPTNO" NUMBER(2,0),       -- department number
CONSTRAINT "PK_EMP" PRIMARY KEY ("EMPNO") USING INDEX PCTFREE 10 INITRANS 2 MAXTRANS 255 COMPUTE STATISTICS STORAGE(INITIAL 65536 NEXT 1048576 MINEXTENTS 1 MAXEXTENTS 2147483645 PCTINCREASE 0 FREELISTS 1 FREELIST GROUPS 1 BUFFER_POOL DEFAULT FLASH_CACHE DEFAULT CELL_FLASH_CACHE DEFAULT) TABLESPACE "USERS" ENABLE,
CONSTRAINT "FK_DEPTNO" FOREIGN KEY ("DEPTNO") REFERENCES "SCOTT"."DEPT" ("DEPTNO") ENABLE
)
In this article, we will show another way which presents the following table generated semi-automatically from the offline database using JDeveloper and Microsoft Excel:
Using the first approach, the drawbacks include:
  • SQL DDL scripts tend to be error-prone
  • Comments are only for human reader and not part of the DB definitions
That's why we propose the second approach which can resolve these two issues.


Offline Database

In JDeveloper, database development is available offline in the context of a project, allowing developers to create and manipulate schemas of database objects which can be generated to a database or to SQL scripts. Database objects can also be imported from a database into a project. See my previous post for more details.

You can follow the instructions in [1, 2] to create offline database objects. For the demo, I've created a database diagram and drag an existing EMP table from the SCOTT schema to create a table on it.


Adding Comments

Double-click the EMP table component on the diagram to open the Edit Table dialog,

Select Comment in the navigation panel to enter table's comment as shown above.
Select Columns in the navigation panel and navigate them one by one. In the Comment field, enter column's comment as shown above. Click Save All to save your work.

In the Application Navigator, under Offline Database Sources | EMP_DATABASE | SCOTT, right-click the EMP node, and choose Generate To > SQL script ... to create SQL script file named emp.sql.
Open emp.sql in the editor window. Look for comments of table's and columns' at the bottom of the script as shown below:

COMMENT ON TABLE EMP IS 'Employee Data';

COMMENT ON COLUMN EMP.EMPNO IS 'employee number';

COMMENT ON COLUMN EMP.ENAME IS 'employee name';

COMMENT ON COLUMN EMP.JOB IS 'job description';

COMMENT ON COLUMN EMP.MGR IS 'manager ID';

COMMENT ON COLUMN EMP.HIREDATE IS 'hiring date';

COMMENT ON COLUMN EMP.SAL IS 'salary';

COMMENT ON COLUMN EMP.COMM IS 'commission';

COMMENT ON COLUMN EMP.DEPTNO IS 'department number';

Select the above comments and copy them into a text file (i.e., emp.txt).


Generating Comment Table

Start up Microsoft Excel and import text file as follows:
On the Text Import Wizard, you specify delimiters using space and paired single quotes as shown below:

After clicking on Finish button, you can remove column A,B, and E. It will then present you with the final comment table as shown at the beginning of this article.


Conclusion

Comment tables generated in the second approach have the following advantages:
  • The source of comment table is offline database object which can be validated by JDeveloper and can be source controlled.
  • They are part of the DB definitions and can be queried as follows:
    • select comments
      from user_tab_comments
      where table_name = 'EMP'
      /
    • select column_name, comments
      from user_col_comments
      where table_name = 'EMP'
      order by column_name
      /


References

  1. Database Development with JDeveloper
  2. Modeling Data with Offline Database in JDeveloper

Modeling Data with Offline Database in JDeveloper

For Oracle Applications developers, the JDeveloper offline database modeler replaces the Oracle Designer repository, or CASE as it was referred to. Applications developers should not use SQL DDL scripts for deployment and source control of database objects, because they tend to error-prone and do not serve as a single source of truth. Instead, developers should use the JDeveloper offline database object files.

What is the Offline Database

JDeveloper provides the tools you need to create and edit database objects, such as tables and constraints, outside the context of a database, using the offline Database model. You can create new tables and views, and generate the information to a database, or you can import database objects from a database schema, make the changes you want, and generate the changes back to the same database schema, to a new database schema, or to a file that you can run against a database at a later date.

Offline Database Model

The JDeveloper Offline database supports the following object types:
  • Function
  • Materialized View
  • Materialized View Log
  • Package
  • Procedure
  • Sequence
  • Synonym
  • Table
  • Trigger
  • Type
  • View
Currently, JDeveloper offline DB objects do not support these objects:
  • Queue
  • Queue tables
  • Policy
  • Context
However, SXML persistence files for these object types can be imported using the applxdf extension.
JDeveloper provides tools to create and edit database objects such as tables, view etc. outside the context of a database. This tool called Offline Database Definition will be used to model physical database objects in Fusion applications. The migration tool will support migrating all user selected database objects defined in CASE to this offline database definition in JDeveloper along with SXML/XDF1 deployment files.

Metadata SXML Comparison Tool[3]

Offline table definitions can be version controlled and shared using a source control system. If you just create objects in the DB schema via the database navigator, you have nothing to source control. JDeveloper provides a comparison tool optimized for working with offline table definitions, which handles:
  • The table data, properties, columns and constraints.
  • The identity of objects, to track name changes.
  • Checking for consistency, for example, ensuring:
    • That a column which is used in a key is not dropped.
    • That a constraint which uses an absent column is not added.
    • That a primary key column cannot be options.
Using this comparison tool, you can compare object metadata of the same type from different databases. This comparison depends on SXML. SXML is an XML representation which more closely maps to the SQL creation DDL. Two SXML documents of the same type can be compared and a new SXML document is provided which describes their differences.
Using this comparison tool, you're able to:
  • Compare object definitions in different JDeveloper projects
    • Since the objects to be compared are in separate projects, you need to create a dependency between them to be able to perform this comparison.
  • Compare versioned copies of DB objects
    • Versioning components allows you to browse through the historical changes of a component and make comparison between these versions. With JDEV, it's possible to compare different versions of database models.

Working on Data Modeling at Different Levels:

  • UML class diagram
    • You can create a logical model using a UML class diagram to visually create or inspect classes, interfaces, attributes, operations, associations, inheritance relationships, and implementation relations and transform it to an Offline or Online Database definitions later.
    • See this tutorial for how-to.
    • You usually do logical modeling using a UML class model in the following steps:
      1. Preparing a class model diagram Environment
      2. Creating a Class Model Diagram
      3. Enhancing the Class Model
      4. Transform the Class Model into a Database Model
  • Database diagram
    • You can follow [4, 5] to create new database diagram.
    • You can also drag tables, views, materialized views, synonyms, and sequences from a database schema onto a database diagram, where they become accessible as offline database objects.
  • Offline Database
    • You can create new offline database objects, or capture them from a connection to a live database. After you have finished working with them, you can generate new and updated database definitions to online database schemas or to SQL scripts.
    • You can follow the instructions in [4, 5] to create new offline database objects. When you create an offline database, you choose the database emulation (for example, Oracle11g Database Release 1) the offline database should have.
    • You can also copy offline database objects to a project. In general, it is a good idea to make sure that the offline database uses the same database emulation as the source database.
    • Note that generation to a database is not certified against non-Oracle databases.

Notes


  1. Prior to SXML migration, these were referred to as xdf (extension) files.

References

  1. http://susanduncan.blogspot.com/
  2. Database Development with JDeveloper
  3. Metadata SXML Comparison Tool
  4. Database Development with JDeveloper

Tuesday, May 24, 2011

Configuring JDBC Data Sources in JDeveloper and Oracle WebLogic Server

In a previous article, we have introduced different ways of creating and managing database connections in JDeveloper. Those connections (i.e. using JDBC URL) are good for the testing of JDeveloper Design-time, Business Components Tester, and Integrated WebLogic Server.

In the production environment, the web application would typically reference a JDBC datasource, since it simplifies maintenance of the connection credentials by allowing them to be centrally managed in the Java EE container. In this article, we will show you how to:
  • Switch from JDBC URL to JDBC DataSource in JDeveloper.
  • Setup global JDBC DataSource for database connection in the WebLogic Server
  • Deploy a Web Application to the WebLogic Server
JDBC URL vs. JDBC DataSource

If you use JDBC URL connection type, you provide settings as shown below:
However, if you use JDBC DataSource connection type, its settings are done on the server. To avoid passwords being present in plain text in deployed files, JDeveloper uses password indirection, which means that passwords for the data sources must be set on the server before the application will run correctly.

A data source object enables a Java Database Connectivity (JDBC) client to obtain a DBMS connection from a JDBC pool. A data source is a vendor-independent encapsulation of a database server connection. The data source offers advantages over a JDBC URL connection because the data source can be tuned, reconfigured, or remapped without changing the deployed application.

In WebLogic Server, you configure database connectivity by adding data sources to your WebLogic domain. WebLogic JDBC data sources provide database access and database connection management. Each data source contains a pool of database connections that are created when the data source is created and at server startup.

Choosing JDBC DataSource

After you finish testing your application using Integrated WebLogic Server and decide to deploy it to a standalone WebLogic Server, then it's time to configure JDBC DataSource as your application's connection type.

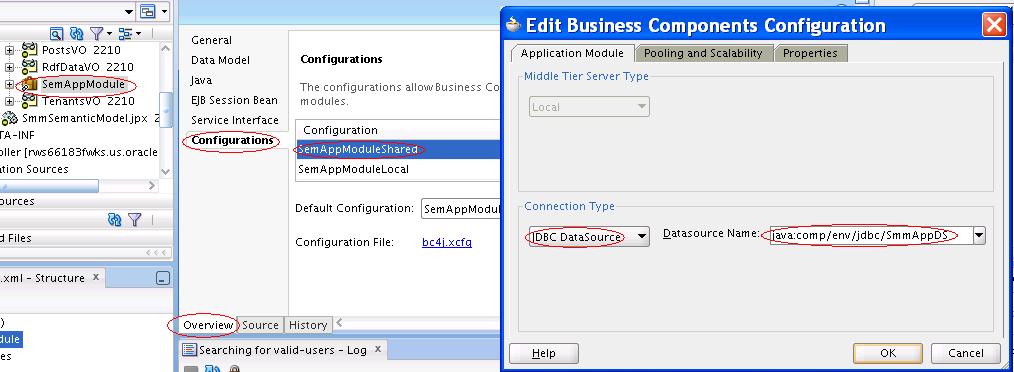
This configuration step is done on the Application Module in the Business Layer.
Edit Business Components Configuration dialog is used to create a new application module configuration or edit an existing one. To open it, do:

Application Navigator context menu for application modules > Configurations > Edit > Application Module tab

You choose to connect to a JDBC DataSource from the dropdown list. The JDeveloper helps create the data source name based on available resource connections. This data source naming convention follows the Java EE standard which specifies that resource connections appear in the application-specific name space java:comp/env/jdbc/. For example, for a connection named 'SmmApp', the JDBC Datasource name would be 'java:comp/env/jdbc/SmmAppDS'.

When you deploy the application and run it in standalone Oracle WebLogic Server, the specified data source connection in the application module configuration will be used.

Setting up Global JDBC DataSource

You can create a global data source on Oracle WebLogic Server Administration Console:

  • http://xbox.mycompany.com:7001/console/
To set up a global data source:
  1. Login to the Oracle WebLogic Server Administration Console. Click on the Data Sources link under JDBC. On the Summary of JDBC Data Sources page, click New. In the Create a New JDBC Data Source page, enter details of the data source.
  2. The name can be anything.
  3. The JNDI name must be of the form jdbc/connection-nameDS. For example, if the application has a connection name SmmApp, the JNDI name is jdbc/SmmAppDS. Ensure that the database type is Oracle and that the driver is Oracle’s Driver (Thin) for Service Connections;Version 9.0.1,9.2.0,10,11. Click Next twice to navigate to the Create a New JDBC Data Source page, where you enter the connection details.
  4. The database name is the Oracle SID.
  5. The host name is the the name of the machine the database is on.
  6. The default port is 1521.
  7. Enter the user name and password, for example hr/hr. Click Next and click Test Configuration. Click Next to navigate to the Select Targets page, where you select a target for this data source. If you fail to select a target, the data source is created but not deployed. Click Finish.

Steps to Deploy to WebLogic Server

Application Properties Dialog is used to to define the deployment profiles that will be available to an application. To open Deployment page, do:

Application menu > Application Properties > Deployment page

Makre sure "Auto Generate and Synchronize weblogic-jdbc.xml Descriptors During Deployment" is unchecked. When this field is not selected, this means that your deployed application will use global data sources on the server.
You can also edit the default deployment profile (i.e. SmmTest_application1--EAR File) or create a new one if needed.

There are two options for the deployment:
  1. Deployed to Ear
  2. Deployed to Application Server
If you want to deploy your application directly to the server, configure Resource Palette with a new Application Server Connection (i.e., xbox) as follows:
You then deploy your application using context menu. Right select your application and select Deploy. Choose the destination to be your application server (i.e., xbox).

References
  1. Database Connections in JDeveloper 11
  2. JDBC Datasources Work in the Business Components Browser in 11g
  3. Configuring JDBC Data Sources
  4. Configuring JDBC Data Sources (WebLogic)
  5. What You May Need to Know About JDBC DataSource
  6. Oracle WebLogic Server Downloads 
  7. Oracle® Fusion Middleware Configuring and Managing JDBC Data Sources for Oracle WebLogic Server 11g Release 1 (10.3.6)

Sunday, May 1, 2011

Invoking Application Module Custom Methods from Oracle ADF Frontend—Why and How?

In an Oracle Fusion web application, you should use managed beans[4] to store logic that is related to the UI rendering only. All application data and processing should be handled by logic in the business layer of the application.

In this article, we'll show how to refresh a calculated attribute[6] named Total Comments after user adds a new comment using Create Comment Dialog. As noted above, refreshing Total Comments should be handled in ADF backend (i.e., ADF Business Components), not ADF frontend (i.e., ADF Faces). Note that ADF backend refers to Model project and ADF frontend refers to ViewController project in a Fusion web application.

Background Information

In the described application, we have two view objects (i.e., TestVO and TestCommentVO) with master-detail relationship. "TotalComments" on the TestVO is a calculated attribute which computes total number of chronological comments (represented by TestCommentVO) added to a test.

On the Test View page, it displays Total Comments column which is also a link. By clicking on the link, user can navigate to the Test Comment page. On the Test Comment page, user is allowed to add new comments. After adding new comments, the Total Comments column on the original Test View page need to reflect the new total.


The Task

To achieve this task, we need to invoke a custom method implemented in ADF Business Components from the Test Comment component implemented in ADF Faces. Method invokation is triggered when user clicks the Save and Close button to save the newly created comment.
The bridge provided between ADF frontend and ADF backend is the Data Binding Layer in Fusion web application[3]. ADF data-binding layer implements the Data Controls and Bindings from JSR-227. The data controls abstract the back-end business service implementations and binding objects link front-end user interface controls in a declarative way to back-end data.

The steps of the task ordered from backend (in blue) to frontend (in black) are summarized here:
  1. Creating a custom method named refreshTotalComments in the application module Class (i.e., SelTestPortalAMImpl.java).
  2. Exporting refreshTotalComments by including the method on the application module's UI client interface.
  3. Adding a new action binding[5] named refreshTotalComments on TestCommentPageDef.xml.
  4. Creating a managed bean named TestCommentBean.java with a method action named saveAndClose. In the method, it will retrieve and execute refreshTotalComments operation binding.
  5. Registering new managed bean in adc-config.xml with the scope of request.
  6. Linking method action saveAndClose on the managed bean to the actionlistener of Save and Close button.
In the following sections, we'll describe those steps in details.

Step 1 — Adding Custom Method to the AppModuleImpl File

To add a custom service method (i.e., refreshTotalComments) to your application module, you must generate the application module class files first.

To generate Java files for your application module class:
  1. In the Application Navigator, double-click the application module.
  2. In the overview editor, click the Java navigation tab and click the Edit java options button.
  3. In the Select Java Options dialog, select Generate Application Module Class.
  4. Click OK.

In SelTestPortalAMImpl.java file, you add your custom service method — refreshTotalComments. Here we have left out the details of refreshTotalComments. For ADF developers need to write a custom method such as refreshTotalComments, you can read this document. It provides a high-level description of the key ADF Business Components classes in the Oracle Application Development Framework and it summarizes the methods that ADF developers write, call, and override most frequently.

Step 2 — Publishing Custom Method on the Application Module’s Client Interface

To include a public method from your application module's custom Java class on the client interface, use the Java Classes page of the overview editor for the application module, and then click the Edit icon in the Client Interface section of the page to display the Edit Client Interface dialog. Select method refreshTotalComments from the Available list and click the Add button to shuttle them into the Selected list. Then click OK to close the editor.


You can include any custom method in the client interface that obeys these implementation rules:
  • If the method has a non-void return type, the type must be serializable (i.e., implements the java.io.Serializable interface).
  • If the method accepts any parameters, all their types must be serializable.
  • If the method signature includes a throws clause, the exception must be an instance of JboException in the oracle.jbo package.

Step 3 — Adding a New Action Binding

In the ViewController project, select Test Comment page and right click it. From the context menu, select "Go to Page Definition." This will bring you to the TestCommentPageDef.xml.

In the Overview editor for the Test Comment page definition’s Bindings and Executables tab, click the Add icon in the Bindings section. Then, follow these steps:
  1. In the Insert Item dialog, select methodAction and click OK.
  2. In the Create Action Binding dialog:
    • Select the data collection (i.e., SelTestPortalAMDataControl) where you have created your handler.
    • From the Operation dropdown list, select the handler (i.e., refreshTotalComments).
    • Click OK.


Step 4 — Creating a New Managed Bean

In the ViewController project, create a managed bean named TestCommentBean.java with a method action named saveAndClose as shown below.
public void saveAndClose(ActionEvent actionEvent) {
try{
// Commit the transaction
OperationBinding  oper = getOperBindings("Commit");
oper.execute();
// refresh total comments
oper = getOperBindings("refreshTotalComments");
oper.execute();
}catch(Exception e){
e.printStackTrace();
}
}
/**
* This methos returns the operation bindings of the passed method name
* @param operation name
* @return
*/
private OperationBinding getOperBindings(String operation) throws Exception
{
OperationBinding oper=null;

try
{
FacesContext facesContext = FacesContext.getCurrentInstance();
ExpressionFactory exp = facesContext.getApplication().getExpressionFactory();
DCBindingContainer bindingContainer =
(DCBindingContainer) exp.createValueExpression(facesContext.getELContext(),
                                      "#{bindings}",
                                       DCBindingContainer.class).getValue(facesContext.getELContext());
// A ControlBinding that binds an datacontrol action, including navigational
// actions such as "Next" and "Prev", or other actions such as "Commit" and
// "Rollback", to a view component.
oper = bindingContainer.getOperationBinding(operation);
}
catch(Exception e)
{
e.printStackTrace();
}
return oper;
} //end getOperBindings

As shown in the code, we need to retrieve two operation bindings (i.e., Commit and refreshTotalComments) from the binding container[7]. Operation binding refreshTotalComments is used at runtime to invoke our Application Module custom method.

Step 5 — Registering New Managed Bean in adc-config.xml

As a general rule for Fusion web applications, a bean that may be used in more than one page or task flow, or one that is used by pages within the main unbounded task flow (adfc-config), should be registered in the adfc-config.xml configuration file.

To register TotalCommentBean in adc-config.xml, do the following:
  1. In the Application Navigator, double-click the adfc-config.xml file in theWEB-INF folder.
  2. In the editor window for the adfc-config.xml file, click the Overview tab.
  3. In the Managed Beans page, in the Managed Beans section click the Add icon and enter TotalCommentBean as the name of the bean, enter the fully qualified class name, and select request scope[8].

Step 6 — Linking Method Action to the ActionListener of Button

The final step is to link method action saveAndClose on the managed bean to the actionListener of Save and Close button as shown below:
<af:commandbutton id="FAsc1"
textandaccesskey="#{applcoreBundle.SAVE_AND_CLOSE}"
shortdesc="#{applcoreBundle.SAVE_AND_CLOSE_SHORT_DESC}"
actionlistener="#{TestCommentBean.saveAndClose}">
</af:commandbutton>
Note that you can achieve this linking declaratively using Property Inspector.

The Explanation

An application module can expose its data model of view objects to clients without requiring any custom Java code. This allows client code to use the ApplicationModule, ViewObject, RowSet, and Row interfaces in the oracle.jbo package to work directly with any view object in the data model.

Whenever there is a need to provide custom codes as shown in our sample application, you should encapsulate the details by writing a custom method in your application module's Java class.

When working with Fusion web applications using the ADF Model layer for data binding, JDeveloper configures a servlet filter in your user interface project (i.e., ViewController) called the ADFBindingFilter. It orchestrates the automatic acquisition and release of an appropriate application module instance based on declarative binding metadata, and ensures that the service is available to be looked up as a data control using a known action binding or iterator binding, specified by any page definition file in the user interface project.

At runtime, you can access the application module's client interface from the DCBindingContainer by naming an ADF action binding or an ADF iterator binding (see step 4). You can also reference the binding context[7] and call methods on the custom client interface in any JSF managed bean.

Reference(s)

  1. Most Commonly Used Methods in ADF Business Components
  2. A detailed look at Binding Model Parameter Options (NDOption)
  3. Oracle ADF Model In Depth
  4. Managed Beans in Oracle Fusion Web Applications
  5. Action Bindings and Method Bindings in Oracle ADF 11g
  6. Examining View Object Attributes in Oracle ADF 11g
  7. Oracle ADF BindingContext and BindingContainer
  8. Types of Memory Scopes in Fusion Web Applications
  9. Oracle Fusion Developer Guide: Building Rich Internet Applications with Oracle ADF Business Components and Oracle ADF Faces
  10. Open Source sample applications for Oracle Fusion Middleware technology
  11. Using Bind Variable to Implement Range Selection Declaratively (Xml and More)
  12. Book Review: Developing Web Applications with Oracle ADF Essentials (Xml and More)

Wednesday, April 27, 2011

Integrated WebLogic Server (WLS)

To run JDeveloper application in a Java EE container, it must be bound to a Server Instance. Integrated WebLogic Server (Integrated WLS) comes packaged with JDeveloper. Testing JDeveloper applications on Integrated WLS Server is easy because:
  • Deployment is optimized and the requirement to zip and copy files is eliminated.
  • Most files run directly from project directories. This feature enables you to make selected changes and refresh these changes while the application is running. For example, any changes made to a JSPX page can be refreshed immediately, without redeploying the application.
  • There is no requirement to undeploy applications after testing and debugging. Applications are undeployed when the Default Server becomes unavailable.
  • JDeveloper enables you to quickly create test users and passwords to test security in Integrated WLS.

Integrated WLS

You can run your applications directly on Integrated WebLogic Server without the need to deploy. The integrated WLS is sufficient to run your application to make sure it displays correctly in browsers, or for testing and debugging portions of the application. However, real end-to-end testing should be done in a standalone Administration Server because that is what will be used in a production environment.
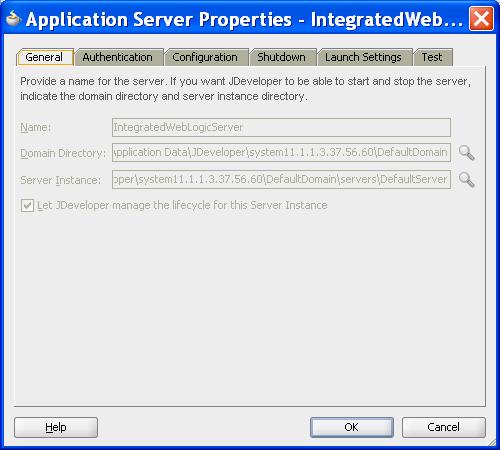
JDeveloper is bundled with a WLS domain, and "DefaultServer" is defined for it. All JDeveloper applications are bound by default to "DefaultServer." In this document, these default settings are assumed. To view the properties of "DefaultServer" Server Instance, in the Application->Application Properties...->Run panel, select "Application Server Properties".
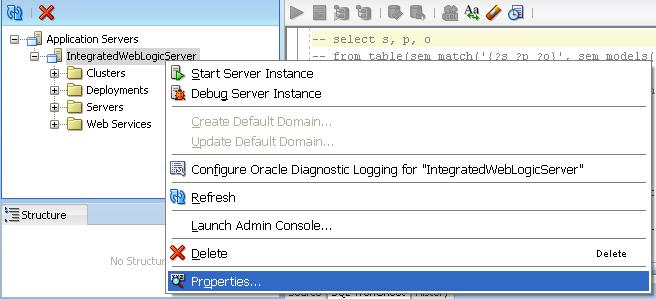
Alternatively, you can view the properties of IntegratedWebLogicServer from the Application Server Navigator:
  1. If necessary, open the Application Server Navigator by choosing View->Application Server Navigator.
  2. Right-click the IntegratedWebLogicServer connection and choose Properties.

DefaultDomain

"DefaultDomain" is bundled with JDeveloper. If you have not explicitly created Integrated WebLogic Server's default domain, it will automatically be created with default settings when you start the server by running or debugging an application. The default domain and its associated default server is located here:
$JDEV_USER_HOME/system11.1.1.1.32.53.52/DefaultDomain/server/DefaultServer
Every Server Instance requires a unique Application Server Connection. "DefaultServer" Server Instance uses bundled Application Server Connection named "IntegratedWebLogicServer" (see Figure). IntegratedWebLogicServer is used by Integrated WLS for deployment and server management. This connection is visible in the Application Server Navigator and the Resource Palette, and can be used to browse and manage this instance.
With a fresh installation of JDeveloper, the "DefaultServer" Server Instance and the "IntegratedWebLogicServer" Application Server Connection are only created the first time a Integrated WLS related action is taken. The actions are: running/debugging/profiling a Java EE application, editing the Server Instances, or editing the application properties->Run properties. The Server Instance must be started once, after which any application can be run repeatedly. You can also start Integrated WLS without starting application as shown below.

How to Start Integrated WLS

Options for starting Integrated WLS are available in the Run menu in JDeveloper.
  • To start it in debug mode, from the Run menu, select Debug Server Instance.
    It is recommended that the service be run in debug mode as it helps in debugging the service.
  • To start it in the regular mode, from the Run menu, select Start Server Instance.
There are a couple of ways to determine if Integrated WLS is running:
  • From the View menu, select Log, and look for the following entry:
    IntegratedWebLogicServer started
  • Access the Integrated WLS console from a browser using weblogic/weblogic1 credential:
    http://localhost:7101/console
The first time the Integrated WLS starts, it tries to use the first available port in the 7101 - 7105 range. The following message appears as the first line in the Default server log in JDeveloper. You should use the chosen port for all access:
*** Using port 7101 ***
or
HTTP port conflict detected. The HTTP port will be reassigned to port 7102.
When you run your application in JDeveloper using the run or debug commands, the Integrated WLS server starts automatically and your application runs in the target browser. When the Run or Debug action is selected on a Java EE node, Integrated WLS runs the entire application and all its projects as a Java EE Application in a Java EE container ("DefaultServer"). Each node type may optionally trigger additional actions, such as launching a browser.

Adminstration Console

The WebLogic console can be deployed and accessed to manage the Integrated WLS (or "DefaultServer").
To view the DefaultServer details:
  1. Go to your web browser and enter the URL: http://<hostname.domainname>:<port>/console
  2. Login to the WLS console using the username and password: weblogic / weblogic1.
  3. Go to the Domain Structure and select DefaultDomain, Control, DefaultServer(admin).

Launch

When Integrated WSL is started, JDeveloper configure its environment as follows:
D:\Oracle\MIDDLE~1\JDK160~1\bin\java -client
-Xms256m -Xmx512m -XX:CompileThreshold=8000 -XX:PermSize=128m  -XX:MaxPermSize=512m
-Dweblogic.Name=DefaultServer
-Djava.security.policy=D:\Oracle\MIDDLE~1\WLSERV~1.3\server\lib\weblogic.policy
-Djavax.net.ssl.trustStore=D:\Oracle\Middleware\wlserver_10.3\server\lib\DemoTrust.jks
...
For troubleshooting, some of these configuration information can be helpful. For example, it tells you where the domain home directory is; what server instance's name is; where the security policy file is read from, etc. In the following sections, we'll discuss some relevant configuration information and where to find them.

Which Port the Integrated WLS Is Assigned to?

If the port display when the Integratede WLS started was buried deeply in the Default server log in JDeveloper or it's simply scroll out of scope, you can still find out which port number it gets assigned to. Look at <listen-port> element inside config.xml which is located here:
 $JDEV_USER_HOME/system11.1.1.1.32.53.52/DefaultDomain/config

Development Mode or Production Mode

You can check if the server is in development mode or production mode by looking in the config.xml for the domain. If config.xml contains the following xml fragment, then it is in production mode:
<production mode-enabled>true</production-mode-enabled>

For Integrated WLS, its config.xml doesn't contain the above xml fragment. However, you can find if it's in development mode or not by reading the log message in the Log view.

Server Credential Store

There are two ways application credentials can be merged onto the server credential store.
  • MERGE
    • MERGE will not change any credential that already exists on the server. For example, if there is a user 'scott' and a password 'tiger' already in the server credential store, and your app wants to change the password for 'scott' to 'foo', it will not work if the mode is MERGE. In order to be able to overwrite a credential on the server, the mode must be OVERWRITE.
  • OVERWRITE
    • Overwriting the master credential store with application credentials is a security risk.
    • The overwrite operation will only work on servers in development mode and also have the overwrite option enabled.
By default, the Integrated WLS is in development mode with OVERWRITE (i.e., -Djps.app.credential.overwrite.allowed=true) flag enabled.

Troubleshooting Web Services on Integrated WLS

  • Log directory
    • $JDEV_USER_HOME/system11.1.1.1.32.53.52/DefaultDomain/servers/DefaultServer/logs
    • Look for DefaultDomain.log, DefaultServer-diagnostic.log, and DefaultServer.log
  • For more information about logging in Oracle Fusion Middleware, see "Managing Log Files and Diagnostic Data" in Oracle Fusion Middleware Administrator's Guide.
  • There are two categories of log files that you can reference to assist in diagnosing problems with Web services:
    • Diagnostic logs--Enable you to access diagnostic data about specific feature components in Oracle Fusion Middleware. For more information, see "Using Diagnostic Logs for Web Services".
      There is a set of predefined diagnostic loggers. You can configure your own diagnostic logger, as described in "Configuring a Diagnostic Logger for a Web Service".
    • Message logs--Enable you to view elements of the SOAP message request. You control message log creation using policies. For more information, see "Using Message Logs for Web Services".
  • Diagnosing Problems with Oracle WSM Policy Manager

References

  1. Integrated WLS
  2. Running and Deploying Applications on WebLogic Server
  3. How to Test the Web Service Using Integrated WLS
  4. How to Manage the Integrated WLS
  5. How to Start and Stop Integrated WLS
  6. Oracle Fusion Middleware Search Results: integrated WLS

Monday, January 31, 2011

Create JPA Entities from Tables with JDeveloper

This article will show you how to create Java Persistence Architecture (JPA) entities from relational tables with JDeveloper.

Java Persistence

The Java Persistence provides an object relational mapping facility to Java developers for managing relational data in Java applications. Java persistence consists of three areas:
  1. Java Persistence API
  2. Object-relational mapping (ORM) metadata
  3. Query language

Java Persistence API

The Java Persistence API (JPA) is the Java specification that provides a standard to ORM in Java. JPA is part of the EJB specification and JEE platform, but can also be used in JSE.

The key object involved in the mapping is Entity. A JPA entity is a lightweight Java class whose state is typically persisted to a table in a relational database. Instances of such an entity correspond to individual rows in the table.

Entities typically have relationships with other entities, and these relationships are expressed through object/relational metadata. Object/relational metadata can be specified directly in the entity class file by using annotations, or in a separate XML descriptor file distributed with the application.

A JPA entity is a Java class meets the following rules:
  • It is a plain old Java object (POJO) that does not have to implement any particular interface (except java.io.Serializable; see explanation below) or extend a special class.
  • The class must not be declared final, and no methods or persistent instance variables must be declared final.
  • The entity class must have a no-argument constructor that is public or protected. The entity class can have other constructors as well.
  • The class must either be annotated with the @Entity annotation or specified in the orm.xml JPA mapping file.
  • The class must define an attribute that is used to identify in an unambiguous way an instance of that class (it corresponds to the primary key in the mapped relational table).
  • Both abstract and concrete classes can be entities, and entities can extend non-entity classes (this is a significant limitation with EJB 2.x).

Using JDeveloper, you can create JPA entities bottom-up from relational tables. JPA entities that implement the java.io.Serializable interface can also be transferred on the wire (for example, they can be serialized over RMI-IIOP).

An Example of JPA Entity

package oracle.apps;

import java.io.Serializable;

import javax.persistence.Column;
import javax.persistence.Entity;
import javax.persistence.Id;
import javax.persistence.NamedQueries;
import javax.persistence.NamedQuery;

@Entity
@NamedQueries({
@NamedQuery(name = "Dept.findAll", query = "select o from Dept o")
})
public class Dept
implements Serializable
{
@Column(nullable = false)
@Id
private Long deptno;
@Column(length = 14)
private String dname;
@Column(length = 13)
private String loc;

public Dept()
{
}
public Dept(Long deptno, String dname, String loc)
{
this.deptno = deptno;
this.dname = dname;
this.loc = loc;
}
public Long getDeptno()
{
return deptno;
}
public void setDeptno(Long deptno)
{
this.deptno = deptno;
}
public String getDname()
{
return dname;
}
public void setDname(String dname)
{
this.dname = dname;
}
public String getLoc()
{
return loc;
}
public void setLoc(String loc)
{
this.loc = loc;
}
}
The Dept class above is conforming to the JavaBean specification and is mapped through the package javax.persistence annotations. For example,
  • @Entity —identifies a Java class as an entity
  • @Table —provides information related to which table and schema the entity corresponds to
  • @Id —is used to identify the property that corresponds to the primary key in the mapped table
  • @Column —provides information related to which column is mapped by an entity property. By default, properties are mapped to columns with the same name, and the @Column annotation is used when the property and column names differ.
Entities support two types of persistence mechanisms:
  1. Field-based persistence—The entity properties must be declared as public or protected and instruct the JPA provider to ignore getter/setters.
  2. Property-based persistence—You must provide getter/setter methods. We recommend to use this approach, because it is more adherent to the Java programming guidelines.

Object-Relational Mapping Metadata

JPA permits the developer to work directly with Java objects rather then with SQL statements. The mapping between Java objects and database tables is defined via persistence metadata.

The object relational mapping of an entity can be done through the use of annotations. As an alternative, you can specify the same information in an external file (called orm.xml ) that must be packaged in the META-INF directory of the persistence module, or in a separate file packaged as a resource and defined in persistence.xml with the mapping-file element.

persistence.xml

persistence.xml, located in META-INF directory, is used to configure your JPA application. Using JDeveloper, this file can be automatically generated when you create Entities from Tables. Within this XML file, persistence units are defined.

Persistence Units

A persistence unit defines a set of entity classes that are managed by one entity manager (described hereafter) instance in an application. This set of entity classes represents the data contained within a single data store.

Entity Manager

Entities cannot persist themselves on the relational database; annotations are used only to declare a POJO as an entity or to define its mapping and relationships with the corresponding tables on the relational database. JPA has defined the EntityManager interface for this purpose to let applications manage and search for entities in the relational database.

Using EntityManager, you can perform:
  • persist—Insert a new entity instance
  • find—Find an instance by key
  • remove—Delete an instance
  • merge—Merge changes of an entity
  • flush—Synchronize with database
  • refresh—Reload from database
  • createNamedQuery—Create an instance of a predefined query
Each EntityManager instance is associated with a persistence context. A persistence context defines the scope under which particular entity instances are created, persisted, and removed through the APIs made available by an EntityManager.

The entity manager tracks all entity objects within a persistence context for changes and updates made, and flushes these changes to the database. After a persistence context is closed, all managed entity object instances become detached from the persistence context and its associated entity manager, and are no longer managed.

JPA Query Language

The Java persistence query language (JPQL) is used to define searches against persistent entities independent of the mechanism used to store those entities. As such, JPQL is portable, and not constrained to any particular data store.

The Java persistence query language is an extension of the Enterprise JavaBeans query language, EJB QL, and is designed to combine the syntax and simple query semantics of SQL with the expressiveness of an object-oriented expression language.

JPA Persistence Provider

Persistence providers are implementations of the Java Persistence API (JPA) specification and can be deployed in the Java EE compliant application server that supports JPA persistence. In this article, we will work with one of the provider named EclipseLink.

EclipseLink is based on the TopLink product, which Oracle contributed the source code from to create the EclipseLink project[1].

In this article, we will focus on one of the multiple EclipseLink persistence services[2]EclipseLink JPA. The EclipseLink JPA provides developers with a standards based Object-Relational persistence solution. In this article, we'll use JPA in a standalone application (i.e., J2SE).

Generating the JPA Entities

In this section, you will generate the JPA entities from the SCOTT database tables (i.e., EMP and DEPT) using JDeveloper. First, let's create a JpaExample application:

  1. Select File > New > Generic Application to bring up the Create Generic Application wizard.
  2. Specify JpaExample in the Name field
  3. Click Next
  4. Select TopLink from the Available list and shuttle it to the right
  5. Click Next
  6. Click Finish

Now that we have a JPA project (i.e., Project1) created. Let's add a JDBC library to the project:
  1. Right select Project1 and select Project Properties to bring up Project Properties Wizard
  2. Select Libraries and Classpath
  3. Click Add Library
  4. On the Add Library Wizard, highlight Oracle JDBC and click OK
  5. Click OK again to close Project Properties Wizard
  6. Click Save All

With Oracle JDBC library added, now we can generate our JPA entities:
  1. Right-click the new JPA project that you created, Project1, and select New > Business Tier > TopLink/JPA > Entities from Tables.
  2. Check EJB 3.0 -- JPA Entities as our JPA/EJB Version
  3. Click Next
  4. On the Persistence Unit step, click New to bring up the New Persistence Unit Wizard
  5. On the Name field, specify empmanager
  6. Click OK
  7. Click Next
  8. Use the default Online Database Connection. Click Next
  9. Need to create a new connection. Click "+" icon
  10. On the Create Database Connection, provide your connection information using scott/tiger credentials
  11. Click Test Connection and then OK
  12. Click Next
  13. Click Query and select both EMP and DEPT tables and shuttle them to the right
  14. Click Next
  15. Click Next
  16. Click Next
  17. Click Finish
As shown in the figure, you will see two Entities (i.e., Dept.java and Emp.java) , persistence.xml, and Offline database files generated:

Adjusting the JPA Objects

The JPA objects generated are only a starting point. They require adjustment and enhancement before elaborating on them with further business logic. Adjustments are required to exploit language conveniences available and to ensure that the entities reflect the business and application domain more accurately.

We will make these adjustments on generated JPA entities:
  • Open Dept.java and add the new annotations to the deptno property as shown below:
    • @Column(nullable = false)
      @Id
      private Long deptno;
  • Open Emp.java and add the new annotations to the empno property as shown below:
    • @Column(nullable = false)
      @Id
      private Long empno;
We also need to make changes to persistence.xml. Open persistence.xml and select Source view. Copy and paste the following contents to it:
<?xml version="1.0" encoding="Cp1252" ?>
<persistence xmlns="http://java.sun.com/xml/ns/persistence"
xmlns:xsi="http://www.w3.org/2001/XMLSchema-instance"
xsi:schemaLocation="http://java.sun.com/xml/ns/persistence http://java.sun.com/xml/ns/persistence/persistence_1_0.xsd"
version="1.0">
<persistence-unit name="empmanager" type="RESOURCE_LOCAL">
<provider>org.eclipse.persistence.jpa.PersistenceProvider</provider>
<class>oracle.apps.Dept</class>
<class>oracle.apps.Emp</class>
<properties>
<property name="javax.persistence.jdbc.driver" value="oracle.jdbc.OracleDriver">
<property name="javax.persistence.jdbc.user" value="scott">
<property name="javax.persistence.jdbc.password" value="tiger">
<property name="javax.persistence.jdbc.url" value="jdbc:oracle:thin:@xxxxx.us.oracle.com:1512:yyyyy">
<property name="eclipselink.target-server" value="WebLogic_10">
</properties>
</persistence-unit>
</persistence>
name
  • (attribute) Every entity manager must have a name.

transaction-type
  • (attribute) Transaction type used. Either JTA or RESOURCE_LOCAL (default to JTA in a JavaEE environment and to RESOURCE_LOCAL in a JavaSE environment). When a jta-datasource is used, the default is JTA, if non-jta-datasource is used, RESOURCE_LOCAL is used.

provider
  • The provider is a fully-qualified class name of the EJB Persistence provider. You do not have to define it if you don't work with several EJB3 implementations. This is needed when you are using multiple vendor implementations of EJB Persistence.

class
  • The class element specifies a fully qualified class name that you will map. By default all properly annotated classes found inside the archive are added to the persistence unit configuration.

properties
  • The properties element is used to specify vendor specific properties. This is where you will define your vendor specific configurations. This is also where you will have to specify JDBC connection information as well.


The following properties can only be used in a SE environment where no datasource/JNDI is available:
  • javax.persistence.jdbc.driver—the fully qualified class name of the driver class
  • javax.persistence.jdbc.url—the driver specific URL
  • javax.persistence.jdbc.user—the user name used for the database connection
  • javax.persistence.jdbc.password—the password used for the database connection

Bootstrapping

The JPA specification defines a bootstrap procedure to access the EntityManagerFactory and the EntityManager. The bootstrap class is javax.persistence.Persistence, e.g.
//properties provide a set of overrides that will take precedence over
//any properties defined in your persistence.xml files
//
//An entity manager factory is typically create at application initialization
//time and closed at application end. It's creation is an expensive process.
//
emf = Persistence.createEntityManagerFactory("empmanager", properties);
EntityManager entityManager = emf.createEntityManager();

Testing JpaExample Application


The final step is to create Entity Manager and execute queries. To achieve that, create a new java file named JpaExample.java in the oracle.apps package with the following contents:
package oracle.apps;

import java.io.Serializable;

import java.util.HashMap;
import java.util.List;
import java.util.Map;


import javax.persistence.*;

import org.eclipse.persistence.config.CacheType;
import org.eclipse.persistence.config.PersistenceUnitProperties;
import org.eclipse.persistence.jpa.*;
import org.eclipse.persistence.sessions.server.*;

public class JpaExample
{
private static EntityManagerFactory ms_emf;
private static volatile boolean ms_initialized = false;

public JpaExample()
{
super();
}
public static void init(){
if (null != ms_emf){
return;
}
Map properties = new HashMap();
properties.put(PersistenceUnitProperties.CACHE_TYPE_DEFAULT,CacheType.NONE);
properties.put(PersistenceUnitProperties.WEAVING,"false");
//The following commented-out line is how we would use the standard
//JPA technique for discovering an EntityManagerFactory.
//ms_emf = Persistence.createEntityManagerFactory("activitygraph",properties);
//But we don't want to discover one. We want to always use the one from
//Eclipselink
PersistenceProvider persistenceProvider = new PersistenceProvider();
// "socialmedia" -- name of persistence unit
// ms_emf = persistenceProvider.createEntityManagerFactory("manager1", properties);
ms_emf = Persistence.createEntityManagerFactory("empmanager", properties);
}

public static EntityManagerFactory getEMF() {
if (!ms_initialized){
synchronized(JpaExample.class){
if(!ms_initialized){
init();
ms_initialized=true;
}
}
}
return ms_emf;
}
public static EntityManager createEntityManager(){
EntityManagerFactory emf = getEMF();
if (null == emf){
throw new RuntimeException("Unable to get an instance of EntityManagerFactory. This usually means that persistence.xml is not in the classpath.");
}
EntityManager entityManager = emf.createEntityManager();
return entityManager;
}

public static void main(String args[])
{
EntityManager entityManager = null;
String jpql = "select o from Dept o";

try{
entityManager = createEntityManager();
Query query = entityManager.createQuery(jpql);
// Batching is only allowed on queries that have a single object in their
// select clausejjj
// See http://wiki.eclipse.org/EclipseLink/UserGuide/JPA/Basic_JPA_Development/Query_Hints#Batch
// "a.relationId" a single-valued relationship path expression.
query.setHint("eclipselink.jdbc.fetch-size", 256);

List resultList;
resultList = query.getResultList();
System.out.println("size = " + resultList.size());
}
finally{
//By closing the Entity Manager we will put all of the objects
//in the "detached" state.
close(entityManager);
}
}
private  static void close(EntityManager entityManager){
if (null == entityManager){
return;
}
if (!entityManager.isOpen()){
return;
}
try{
entityManager.close();
}
catch(Throwable e){
System.out.println("An exception occurred while closing an entity manager");
}
}
}

To test the application, right-click JpaExample.java and select Run.

References

  1. EclipseLink on Wikipedia
  2. EclipseLink
  3. Oracle JDeveloper Downloads

© Travel for Life Guide. All Rights Reserved.

Analytical Insights on Health, Culture, and Security.