Cross Column

Showing posts with label Oracle Fusion Applications. Show all posts

Friday, September 27, 2013

Configuring Diagnostic Framework (DFW) Settings

A while ago, I've posted an article titled
Understanding WebLogic Incident and the Diagnostic Framework behind It[1]

This article is a follow-up of that one.  In this article, we will discuss how to configure Diagnostic Framework Settings.

Diagnostic Framework (DFW)


A quick recap what Diagnostic Framework (DFW) is.  Oracle Fusion Middleware includes a Diagnostic Framework (DFW). DFW is available with all FMW 11g installations that run on WebLogic Server. It aids in detecting, diagnosing, and resolving problems, which are targeted in particular critical errors.

There are two ways that you can modify DFW settings:
  1. Modifying the configuration file named dfw_config.xml
  2. Making updates via Fusion Middleware Control (FMW Console)[2]
In this article, we will show how to modify the following setting:
  • maxTotalIncidentSize 
which configures the maximum total disk space allocated to incidents.

Configuration File


DFW's configuration file is named dfw_config.xml.  There is one dfw_config.xml file for each server.  For example, there is one for  CRMCommonServer_1:
  • config/fmwconfig/servers/CRMCommonServer_1/dfw_config.xml
in the CRMDomain.

Here is the sample contents of dfw_config.xml:
<?xml version="1.0" encoding="UTF-8"?>
<diagnosticsConfiguration xmlns="<snipped>" 
  xmlns:xs="http://www.w3.org/2001/XMLSchema-instance">
  <!-- maxTotalIncidentSize configures the maximum total disk space
       allocated to incidents, in megabytes. -->
  <incidentCleanup maxTotalIncidentSize="500"/>
  <incidentCreation
    incidentCreationEnabled="true"
    logDetectionEnabled="true"
    uncaughtExceptionDetectionEnabled="true"
    floodControlEnabled="true"
    floodControlIncidentCount="5"
    floodControlIncidentTimePeriod="60"
    reservedMemoryKB="512"/>
  <threadDump useExternalCommands="true"/>
  <dumpSampling enabled="true">
    <dumpSample
      sampleName="JVMThreadDump"
      diagnosticDumpName="jvm.threads"
      samplingInterval="60"
      rotationCount="10"
      dumpedImplicitly="true"
      toAppend="true">
      <dumpArgument name="timing" value="true"/>
      <dumpArgument name="context" value="true"/>
    </dumpSample>
    <dumpSample
      sampleName="JavaClassHistogram"
      diagnosticDumpName="jvm.classhistogram"
      samplingInterval="1800"
      rotationCount="5"
      dumpedImplicitly="false"
      toAppend="true">
    </dumpSample>
  </dumpSampling>
</diagnosticsConfiguration> 
In our case, we would like to update
  • maxTotalIncidentSize
to 150 MB from 500 MB.

FMW Console


To start Oracle Enterprise Manager 11g, I have used the following URL:
  • http://myserver.oracle.com:9001/em

The following diagrams show how to configure
  • maxTotalIncidentSize 
using the Fusion Middleware Control System MBean Browser:
  1. From the target navigation pane, expand the farm, then WebLogic Domain.
  2. Select the domain.
  3. From the WebLogic Domain menu, choose System MBean Browser.
  4. The System MBean Browser page is displayed.
  5. Expand Application Defined Beans, then oracle.dfw, then domain.domain_name, then dfw.jmx.DiagnosticsConfigMBean.
  6. Select one of the DiagnosticConfig entries. There is one DiagnosticConfig entry for each server.
  7. In the Application Defined MBean pane, expand Show MBean Information to see the server name.


Monday, March 18, 2013

How to List Current Message Levels of All Loggers Using WLST?

In our Fusion application deployed in WebLogic Server, it has generated too many messages. Therefore, we would like to disable most of them. However, before we do that, we also want to check out what current message levels of loggers are.

In this article, we will show you how to:
  • Redirect WLST print messages to an output file
  • List current message levels of all loggers associated with a managed server (i.e., "MS_1")
    • With the getLogLevel command

Redirect WLST print Statement


If you try to redirect WLST output to a log file using the following WLST command. 

wls:/fod_domain/serverConfig> redirect('./logs/wlst.log', 'false')

It won't work.  Instead , you should follow the instructions below[1] to redirect WLST's print statement to a file:

from java.io import File
from java.io import FileOutputStream
f = File("/scratch/aime1/tmp/wlst.log")
fos = FileOutputStream(f)
theInterpreter.setOut(fos)
print "start the script"

How to List Current Message Levels of All Loggers?


To get the current message level, you can use getLogLevel command. Note that you must be connected to WebLogic Server before you use the configuration commands.

From below, find the full list of commands that achieved the task:

$cd $MW_HOME/wlserver/common/bin
$./wlst.sh


Initializing WebLogic Scripting Tool (WLST) ...
Welcome to WebLogic Server Administration Scripting Shell
Type help() for help on available commands

wls:/offline> connect ('weblogic','weblogic1','t3://localhost:7001')
Connecting to t3://localhost:7001 with userid weblogic ...
Successfully connected to Admin Server "AdminServer" that belongs to domain "fod_domain".

Warning: An insecure protocol was used to connect to the
server. To ensure on-the-wire security, the SSL port or
Admin port should be used instead.

wls:/fod_domain/serverConfig> from java.io import File
wls:/fod_domain/serverConfig> from java.io import FileOutputStream
wls:/fod_domain/serverConfig> f = File("/scratch/aime1/tmp/wlst.log")
wls:/fod_domain/serverConfig> fos = FileOutputStream(f)
wls:/fod_domain/serverConfig> theInterpreter.setOut(fos)
print "start the script"
listLoggers(target='MS_1')

Note that we typed CTRL-D to exit from WLST at the end.

The Output

Here is the output from the getLogLevel command (note that it lists messages levels of all loggers associated with a server named MS_1):

wls:/fod_domain/serverConfig> start the script
wls:/fod_domain/serverConfig> Location changed to domainRuntime tree. This is a read-only tree with DomainMBean as the root.
For more help, use help('domainRuntime')
-------------------------+-----------------
Logger                   | Level
-------------------------+-----------------
<root>                   | NOTIFICATION:1
Security                 | <Inherited>
com                      | <Inherited>
com.oracle.coherence     | TRACE:16
...

References

Sunday, January 27, 2013

Creating the Required Schemas for Oracle Fusion Middleware Using RCU

To create required schema for Oracle Fusion Middleware[1], you can use Repository Creation Utility (RCU)[2]. You can also use RCU to drop component schemas.  In this article, we will show you how to create schema for the component named OID and discuss the significance of schema prefix.

Repository Creation Utility


Repository Creation Utility (RCU) is a Java tool to create database schema for component schemas that are part of Oracle Fusion Middleware.  RCU is available only on 32-bit x86 Linux and 32-bit Microsoft Windows Operating System platforms. You can run RCU from these machines to connect to any certifed versions of Oracle, or Microsoft SQL Server database, in order to create the schemas required by Fusion Middleware components.

Preparations and Prerequisites


If you are creating schemas on an Oracle database, you must use a user with SYSDBA privileges such as SYS[3].

Here is the outline of instructions of creating new schemas:
  1. Start up your database instance (i.e., ATGOID)
  2. Start tns listener
  3. Download the RCU and unzip it
  4. Open the RCU by invoking rcu in the bin folder
  5. Create component schemas as shown in the next section


Steps


The following sequence takes place when a schema is created with RCU (note that highlighted portion is the option that we have chosen for our installation):
  1. Welcome
  2. Create Repository
    • Create
      • Create and load component schemas into a database
    • Drop
      • Remove component schemas from a database
  3. Database Connection Detail
    • See Figure 1
    • Make sure prerequisite step 1 &2 were executed first.  Otherwise, you will see the following messages:
      • Unable to connect to the database using the provided details.
        Please enter a valid hostname and port or check if the listener is up and running.
    • When you click on Next, Checking Prerequisites window will be displayed (see Figure 1)
      • Prior to the schema being created, RCU performs global and component level prerequisite checks to ensure that certain minimum requirements are met.
    • You may see warning such as:
      • The database you are connecting is with non-AL32UTF8 character set. Oracle strongly recommends using AL32UTF8 as the database character set.
  4. Select Components
    • See Figure 2
      • Select an existing Prefix
      • Create a new Prefix: (Leave it empty; see why in next section)
    • When you click on NExt, Checking Component Prerequisites window will be popped up
  5. Schema Password
    • Enter the passwords for the main and auxiliary schema users.
      • Use same passwords for all schemas
      • Use main schema pssswords for auxiliary schemas
      • Specify different passwords for all schemas
    • Component
      • Oracle Internet Directory (Owner: ODS)
      • Auxiliary Schema (Owner: ODSSM)
  6. Map Tablespaces
    • Choose tablespaces for selected components (Default)
  7. Summary
    • Database details
      • Host Name: myserver
      • Port: 1521
      • Service Name: ATGOID
      • Connected As: sys
      • Operation: Create
      • Prefix for (non-prefixable) Schema Owners : DEFAULT_PREFIX
      • Component
        • Name: Oracle Internet Directory
        • Schema Owner: ODS
        • Tablespace Name:
          • Default: OLTS_DEFAULT
          • Temp: IAS_TEMP
          • Additional:
            • OLTS_ATTRSTORE
            • OLTS_BATTRSTORE
            • OLTS_CT_STORE
            • OLTS_SVRMGSTORE
  8. Completion Summary
    • RCU Logfile: $ORACLE_BASE/logdir.2013-01-15_11-03/rcu.log
    • Component Log Directory: $ORACLE_BASE/logdir.2013-01-15_11-03
    • Status: Success

Schema Prefix


You can use RCU to create multiple schemas of each component using custom prefixes. The prefix is prepended to and separated from the schema name with an underscore (_) character, as shown below:
  • prefix_schemaname
However, the Oracle Internet Directory (ODS) component cannot be prepended with a custom prefix because there can only be one repository for this component per database.  That's why we said that leave the new prefix empty at step 4 above.

The default prefix used by RCU is DEV.  If DEV has already been used, then RCU will default to DEV1, then DEV2, and so on. Prefixes are used to create and organize logical groups of schemas. For example, you may want to create a test version of the Metadata Services (schema name MDS) called TEST_MDS.  Then, when are ready for your production version, you can create a second version of the schema called PROD_MDS. Both TEST_MDS and PROD_MDS may reside on the same or separate databases.

You are only allowed to use a prefix once per schema within a single database. For example, if you had a version of the Metadata Services schema called DEV_MDS, then you can not use the DEV prefix again to create another version of the Metadata Services schema (for example, DEV_MDS2).  If you want to create another version of the schema using the same prefix, you must first drop the existing schema and then create the schema again.

Finally, the mapping between the prefixes and schemas is maintained in schema_version_registry.


SQL> select comp_id,mrc_name from SCHEMA_VERSION_REGISTRY;
COMP_ID                        MRC_NAME                       
------------------------------ ------------------------------ 
OID                            DEFAULT_PREFIX                 
ORASDPM                        DEV                            
SOAINFRA                       DEV                            

3 rows selected

References


  1. Oracle Fusion Middleware Articles
  2. Repository Creation Utility Overview
  3. What’s the Difference between the SYS and SYSTEM Schemas?
  4. Using Custom Prefixes
  5. Oracle Identity and Access manager 11g for Administrators

Friday, December 14, 2012

How to Configure Logging Using Weblogic Scripting Tool

Weblogic Scripting Tool (WLST) is a command-line tool that runs on the same machine as the Weblogic server and allows the user to browse the configuration and state of the server through a tree of mbeans (managememnt beans).  It is based on the Java scripting interpreter, Jython.

Using WLST, you can configure a server instance’s logging and message output.  To determine which log attributes can be configured, see LogMBean and LogFileMBean in the WebLogic Server MBean Reference[1].

In this article, we first show you how to configure log attributes from WebLogic Server Administration Console and then show you how to set attributes of LogMBean using WLST.

Modifying Attribute from WLS Console


To bring WLS Administration Console up, you type the following address into your browser's address field:
  • http://<myserver>:7001/console
and log in with your credentials (say, "weblogic/weblogic1").  To modify "Rotation file size" of the log attribute, you do:
  • Click "Lock & Edit"
  • Select and Click:
    • Environment > Servers > CRMDemo_server1 > Logging
You modify "Rotation file size" to be a different value and then activate your change.  


Next to the "Rotation file size" field, you can click on "More Info..." to see its detailed description.

As you can see, "Rotation file size" field is linked to the following MBean Attibute:
  • LogMBean.FileMinSize

Modifying Attribute from WLST


Instead of modifying log attributes from the console, you can also achieve it by using WLST.

$cd $MW_HOME/wlserver_10.3/common/bin
$./wlst.sh
wls:/offline> connect("weblogic","weblogic1", "t3://localhost:7001")  
wls:/atgdomain/serverConfig> cd("Servers/CRMDemo_server1/Log/CRMDemo_server1")
wls:/atgdomain/serverConfig/Servers/CRMDemo_server1/Log/CRMDemo_server1> ls()
dr--   DomainLogBroadcastFilter
dr--   LogFileFilter
-r--   FileMinSize                                  5000
-r--   FileName                                     logs/CRMDemo_server1.log
 .
 .
 .
-r-x   unSet                                        Void : String(propertyName)

As shown above, this is what happened:
  1. We connected to the server
  2. We set Current Management Object (CMO) to the server log config
  3. We listed all LogMBean attributes
  4. Our log attribute FileMinSize was shown on the list
To modify "FileMinSize" log attribute, you can create a script (i.e., setFileMinSize.py) such as:

# Connect to the server
connect("weblogic","weblogic1","t3://localhost:7001")
edit()
startEdit()
# set CMO to the server log config
cd("Servers/CRMDemo_server1/Log/CRMDemo_server1")
ls()
# change LogMBean attributes
set("FileMinSize", 400)
# list the current directory to confirm the new attribute values
ls()
# save and activate the changes
save()
activate(block="true")
# all done...
exit()

Thursday, October 11, 2012

Passivation and Activation in Oracle ADF—jbo.passivationstore

The passivation/activation implementation in Oracle ADF Business Components[1] is designed to keep transaction states across multiple requests or sessions.

In this article, we will discuss one aspect of the passivation/activation implementation in Oracle Fusion Applications—the passivation store.

Passivation and Activation


There are two kinds of pools in use when running a typical Fusion web application:

  • Application Module (AM) pools
  • Database connection pools

An application module pool is a collection of instances of a single application module type which are shared by multiple application clients. As for database connection pools, they are usually maintained by the J2EE container. You can read [9] for more details. To tune Fusion Application's performance, you need to understand both pools[8].

Each time a user accesses a resource and that resource uses an AM to display data, the Application Module pool manager assigns an AM instance to the user session. If the pool runs out of connections, the AM pool Manager passivates the state of one of the sessions (either in the database or in a file), thus releasing an instance and assigning it to the new session. When the user that was passivated resumes their work, ADF will activate their state from the configured store. This is done automatically for you.

Passivation Store


In order to manage application module pending work, the application module pool asks AM instances to "snapshot" their state to XML at different times. If the value of the jbo.dofailover configuration parameter is true (default), then this XML snapshotting will happen each time the AM instance is released to the pool.

The AM instance snapshots can be saved either in the database or in a file. To configure it, you can set jbo.passivationstore to be:
  • database
  • file

File Store


If you set jbo.passivationstore to be file, by default passivation should go to use.dir. However, you can change the location by setting:
  • -Djbo.tmpdir
For example, in our CRM Fusion Application, we have selected file to be the passivation store. But, we didn't set its location (i..e jbo.tmpdir). By default, it used "user.dir":
  • <Installation Home>/instance/domains/<Server Name>/CRMDomain

To find out where "user.dir" points to on Linux, you can do:

$ls -l /proc/<pid>/cwd
cwd -> /c1/mt/rup1/instance/domains/myserver/CRMDomain


So, going to that directory, you can find a bunch of files used by CRM for passivation:

-rw-r----- 1 mygrp testuser 6380   Oct 11 10:04 BCacc13d9BCD
-rw-r----- 1 mygrp testuser 263    Oct 11 10:04 BC325e092dBCD
-rw-r----- 1 mygrp testuser 127186 Oct 11 10:04 BC166a7e7fBCD


DB Store


If you set jbo.passivationstore to be database (default), XML snapshots will be written to a BLOB column in a row of the PS_TXN table in the database.

While the file-based option is a little faster, unless your multiple application server instances share a file system, then the the database-backed passivation scheme is the most robust for application server-farm and failover scenarios.

Configuration Parameters


To summarize, the following configuration parameters are related to this topic:
  • jbo.dofailover
    • Enables eager passivation or not
  • jbo.passivationstore
    • Dictates the store type
  • jbo.tmpdir
    • Specifies the location for file store
You can reference [10] for other application module pool configuration parameters.

References

  1. Oracle ADF Essentials
  2. Reusable ADF Components—Application Modules
  3. Java System Properties
  4. Why is the user.dir system property working in Java?
  5. ADF BC Passivation/Activation and SQL Execution Tuning
  6. Demystifying ADF BC Passivation and Activation
  7. Ensuring that your ADF Application is Passivation/Activation Safe
  8. Understanding Application Module Pooling Concepts and Configuration Parameters
  9. Monitoring WebLogic JDBC Connection Pool at Runtime
  10. What You May Need to Know About Application Module Pool Parameters

Tuesday, March 20, 2012

Using JXplorer to Learn Oracle Internet Directory

JXplorer[1] is an open source ldap browser originally developed by Computer Associates' eTrust Directory development lab. It is a standards compliant general purpose ldap browser that can be used to read and search any ldap directory, or any X500 directory[4] with an ldap interface.

Oracle Internet Directory (OID) is an LDAP V3-compliant directory service.  LDAP (Lightweight Directory Access Protocol) was conceived as an Internet-ready, lightweight implementation of the X.500 standard for directory services.  In this article, we will use JXplorer to explore the structure of OID.

OID Component and Instance

When you install Oracle Internet Directory[2] on a host computer, Oracle Identity Management 11g Installer creates a system component of type OID in a new or existing Oracle instance.

The Oracle Internet Directory component contains an OIDMON process (i.e. Oracle Internet Directory Monitor process) and an Oracle Internet Directory instance. The Oracle Internet Directory instance consists of a dispatcher process and one or more OIDLDAPD processes.


The component name for the first Oracle Internet Directory component is usually oid1 and the Oracle instance name is chosen during the installation, usually asinst_1.

Oracle Identity Management 11g Installer also creates the following instance-specific configuration entry for this component during installation:
  • cn=oid1,cn=osdldapd,cn=subconfigsubentry

In summary, OID components and instances are created as below:
  • oid1
    • The first Oracle Internet Directory component
        • Successive installations in the cluster will have the component names oid2, oid3, and so forth.
        • This new Oracle Internet Directory component consists of 
          • An OIDMON process
          • An OIDLDAPD dispatcher process
          • One or more OIDLDAPD server processes
      • File system directories created by installer
        • ORACLE_INSTANCE/config/OID/oid1
        • ORACLE_INSTANCE/diagnostics/logs/OID/oid1
    • asinst_1
      • Oracle instance name is chosen during the installation, usually is asinst_1

    JXplorer

    You explore OID by making a connection to it first.  An LDAP server is called a Directory System Agent (DSA).
    OID uses the following default ports:
    • SSL port: 3131
    • Non SSL port: 3060
     In the User DN, you specify:
    • cn=orcldadmin
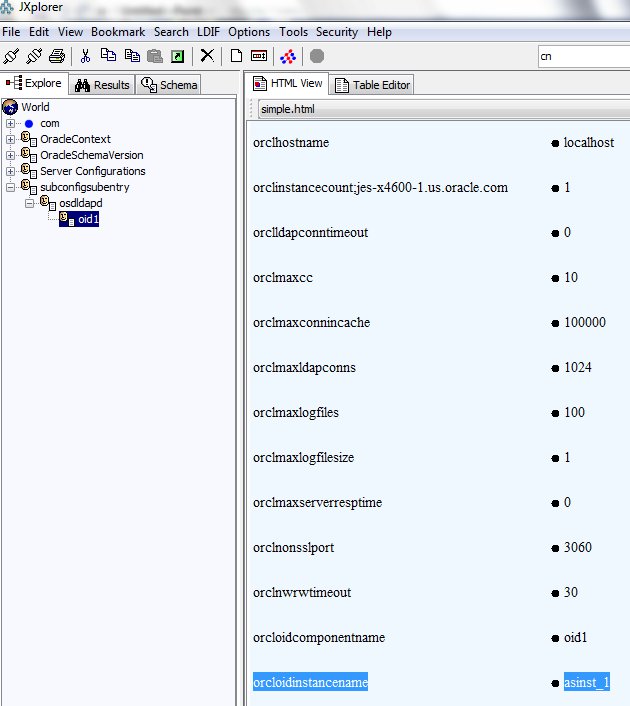
    On the left panel, you can find oid1 in the hierarchical tree-like structure (i.e., Directory Information Tree).  If you right click on it and select Copy DN,

    the DN (i.e., distinguished name) of oid1 configuration entry is returned:
    • cn=oid1,cn=osdldapd,cn=subconfigsubentry

    The action in LDAP takes place around entries such as oid1.  An entry is defined as a set of attributes, and an attribute is a set (i.e., unordered) of values.  For example, oid1 has the following attributes:
    • orcloidinstancename: asinst_1
    • orclmaxcc: 10
    • etc.
    OID component oid1 has one instance named asinst_1.   It also has other attributes such as orclmaxcc which specifies maximum number of DB connections or orclserverprocs which specifies number of server processes.  You can modify them to tune OID's performance.

    Configuring the Oraccle Internet Directory Authentication Provider

    You can follow the instructions here to set up OID as one of the authentication providers in WebLogic Server.  Some of the information required for the setup can also be found from JXplorer.  For example, to find user base DN and group base DN, you can right click on the Users or Groups and select "Copy DN":
     
    • User base DN : cn=Users, dc=us, dc=oracle, dc=com 
    • Group base DN : cn=Groups, dc=us, dc=oracle, dc=com
    Entry's name is specified by LDAP's naming model.  Entry's name (i.e., a DN) is composed of RDNs (i.e., Relative Distinguished Name) which are separated by commas.   DNs are more like postal addresses because they have a “most specific component first” ordering.  In our example, entry Users has a distinguished name:
    • cn=Users, dc=us, dc=oracle, dc=com
    where cn is the shorthand for common name and dc is the shorthand for domain componentUser base DN and group base DN are used by WebLogic Server to search users and groups within OID.

    References

    1. JXplorer
    2.  Oracle® Fusion Middleware Administrator's Guide for Oracle Internet Directory 11g Release 1 (11.1.1)
    3. Lightweight Directory Access Protocol
    4. International Standardization Organization (ISO) X.500 
    5. Configure the Oracle Internet Directory Authentication provider
    6. Oracle Fusion Middleware Security Blog

    Saturday, November 5, 2011

    Sub-flow Design Pattern

    A design pattern is a formal documentation of a proven solution to a common problem. Within Oracle Fusion Web Applications[1], there are many design patterns embedded in their design. One of them is sub-flow design pattern.

    Before you start, read this companion article first.

    Usage

    In sub-flow design pattern, there are two task flows involved:
    • Parent task flow (top-level)
    • Sub-flow
    In Oracle Fusion Web Applications, all top-level task flows can be bookmarked and be launched from either task list or Recent Items menu. However, if the application requires that sub-flows can also be bookmarked and be launched from Recent Items menu. Then this sub-flow design pattern can be utilized for that functionality.

    If sub-flows are bookmarked, it can be relaunched from Recent Items menu. In the sub-flows, it's required that users can also navigate back to its parent flow. Sub-flow design pattern also takes that into consideration.

    Overview

    To record sub-flows into the Recent Items list, applications need to call openSubTask API right before sub-flows are launched[2]. openSubTask takes parameters similar to openMainTask's. One of them is task flow ID. For this, you need to specify parent flow's ID (or main task's ID). In other words, sub-flows need to be executed via parent flow even they are launched from Recent Items menu. See Sample Implementation section for details.
    If your sub-flow doesn't need to be bookmarked by Recent Items, you don't need to change anything. Otherwise, you need to modify your parent flow and sub-flow as described in the following task. After the changes, sub-flows can be launched in two ways:
    1. From original flows
    2. From Recent Items menu items using recorded information
    Both will start the execution in parent flow. Because sub-flow needs to be launched via parent flow in the 2nd case above, you need to change parent flow in this way:
    1. Add a new router activity at the beginning of the parent flow. Based on a test condition (to be described later), it will route the control to either the original parent flow or the task flow call activity (i.e., the sub-flow).
    2. Add an optional method call activity to initialize sub-flow before it's launched for the 2nd case (i.e., launching from Recent Items menu). Fusion developers can code the method in such a way that it can navigate to the sub-flow after initializing the parent state. This allows applications to render contextual area, navigating back to parent flow from sub-flow and any other customizations.
    3. Bind openSubTask to the command component (i.e., link or button) which causes the flow navigate to the task flow call activity in the original parent flow. openSubTask API registers the parent flow details (to be launched as a sub-flow later) to the Applications Core task flow history stack.
    Usually, you don't need to modify your sub-flow for this task. However, you can consolidate the initialization steps from two execution paths in such a way:
    1. Remove initialization parts from both paths in the parent flow. Instead set input parameters (which to be used as test conditions in sub-flows) in both paths only.
    2. Modify sub-flow to take input parameters.
    3. Add a new method call (say initSubFlow) at beginning of the sub-flow to initialize states in parent flow (for example, parent table) so that sub-flow can be launched in the appropriate context.
    Note that the design pattern also requires the application capable of navigating back to parent flow from sub-flow. So, the initialization code should take this into consideration (i.e., set up states to allow sub-flow to navigate back) too.
    In the following, we'll use an Employee sample implementation to demonstrate the details of this design pattern.

    Sample Implementation

    In this Fusion Web Application, users select Subflow Design Pattern from the Task list. They then specify some criteria for searching a specific employee or employees. From the list, they can choose the employee that they want to show the details for. This procedure is demonstrated in the following screen shots:
    Ename in the search result table is a link which can be used to navigate to the employee detail page of a specific employee. When this link is clicked, a sub-flow (or nested bounded task flow) is called and it displays the Employee Complete Detail page.

    If users would like to add this Employee Complete Detail page of a specific employee (say, employee named 'Allen') to their Recent Items list, application developers need to set up something extra to make this happen. If this page (actually what gets recorded is a bounded task flow whose default page is displayed) has been bookmarked, next time users can click it on the Recent Items menu and launch it directly by skipping the search step (i.e., identify the Employee whose details need to be displayed).

    Implementation Details

    Our parent task flow named ToParentSFFlow is shown below:


    decideFlow in the diagram is the router activity that decides whether the control flow should go to either original parent flow path (i.e., "initParent") or sub-flow path (i.e., "toChild"). The condition we used is defined as follows:
    <router id="decideFlow">
     <case>
       <expression>#{pageFlowScope.Empno == null}</expression>
       <outcome id="__9">initParent</outcome>
     </case>
    
     <case>
       <expression>#{pageFlowScope.Empno != null}</expression>
       <outcome id="__10">toChild</outcome>
     </case>
    
     <default-outcome>initParent</default-outcome>
    </router>
    In the test, we check whether Empno variable in the parent flow's pageFlowScope is null or not. #{pageFlowScope.Empno} is set via its input parameter Empno when parent flow is called . The input parameters on the parent flow (i.e., ToParentSFFlow) is defined as follows:
    <input-parameter-definition>
      <name>Empno</name>
      <value>#{pageFlowScope.Empno}</value>
      <class>java.lang.String</class>
    </input-parameter-definition>
     
    When parent flow is launched from Task List, parameter Empno is not set (i.e., not defined in the Application menu's itemNode). Therefore, it's null and router will route it to "initParent" path.
    When sub-flow is recorded via openSubTask API, we set Empno on the parametersList as follows:
    <methodAction id="openSubTask" RequiresUpdateModel="true"
                     Action="invokeMethod" MethodName="openSubTask"
                     IsViewObjectMethod="false" DataControl="FndUIShellController"
                     InstanceName="FndUIShellController.dataProvider"
                     ReturnName="FndUIShellController.methodResults.openSubTask_FndUIShellController_dataProvider_openSubTask_result">
         <NamedData NDName="taskFlowId" NDType="java.lang.String"
             NDValue="/WEB-INF/oracle/apps/xteam/demo/ui/flow/ToParentSFContainerFlow.xml#ToParentSFContainerFlow"/>
         <NamedData NDName="parametersList" NDType="java.lang.String"
                    NDValue="Empno=#{row.Empno}"/>
         <NamedData NDName="label" NDType="java.lang.String"
                    NDValue="#{row.Ename} complete details"/>
         <NamedData NDName="keyList" NDType="java.lang.String"/>
         <NamedData NDName="taskParametersList" NDType="java.lang.String"/>
         <NamedData NDName="viewId" NDType="java.lang.String"
                    NDValue="/DemoWorkArea"/>
         <NamedData NDName="webApp" NDType="java.lang.String"
                    NDValue="DemoAppSource"/>
         <NamedData NDName="methodParameters"
             NDType="oracle.apps.fnd.applcore.patterns.uishell.ui.bean.FndMethodParameters"/>
    </methodAction>
     
    We also set up:
    • taskFlowId to be parent flow's, not subflow's
    • label to be subflow's
    When end users click on the link (i.e., Ename), which the openSubTask method is bound to, openSubTask will be called. This link component is defined as follows:
    <af:column sortProperty="Ename" sortable="false"
               headerText="#{bindings.ComplexSFEmpVO.hints.Ename.label}"
               id="resId1c2">
      <af:commandLink id="ot3" text="#{row.Ename}"
                      actionListener="#{bindings.openSubTask.execute}"
                      disabled="#{!bindings.openSubTask.enabled}"
                      action="toChild">
        <af:setActionListener from="#{row.Empno}"
                              to="#{pageFlowScope.Empno}"/>
      </af:commandLink>
    </af:column>


    Note that when the link is clicked, actionListener and action specified on the link are executed and in that order. Also note that openSubTask needs to be called only from the original parent flow path (i..e, "initParent"), not sub-flow path(i.e., "toChild).
    EmployeeeDetails activity in the above figure is a Task Flow Call activity which invokes our sub-flow (i.e., ToChildSFFlow). Before sub-flow is executed, you need to add some initialization steps. These initialization steps could include, but not limited to:
    • Set up parent states. For our example, we need to set selected employee's row to be current.
    • Set up contextual area state.
    • Set up states to allow sub-flow to navigate back to parent flow.
    There are two approaches to set up initialization steps:
    1. In the parent flow
    2. In the sub-flow
    For the first approach, you can add logic to initialize both paths before the task flow call activity in the parent flow. For the second approach, you initialize states in the sub-flow by using input parameters of the sub-flow. For example, in our example, sub-flow will take an input parameter named Empno. So, the second approach just postpone the initialization to the sub-flow.
    Let's see how input parameters are defined in Task Flow Call activity and sub-flow.
    Here is the definition of input parameters in our Task Flow Call activity:
    
    <task-flow-call id="EmployeeDetails">
         <task-flow-reference>
           <document>/WEB-INF/oracle/apps/xteam/demo/ui/flow/ToChildSFFlow.xml</document>
           <id>ToChildSFFlow</id>
         </task-flow-reference>
         <input-parameter>
           <name>Empno</name>
           <value>#{pageFlowScope.Empno}</value>
         </input-parameter>
    </task-flow-call>
    
     
    Note that this means that the calling task flow needs to store the value of Empno in #{pageFlowScope.Empno}. For example, from the original parent flow path, it is set to be #{row.Empno} using setActionListener tag. For the sub-flow path, it is set using parent flow's input parameter named Empno. On the sub-flow, we need to specify its input parameters as below:
    <task-flow-definition id="ToChildSFFlow">
       <default-activity>TochildSFPF</default-activity>
       <input-parameter-definition>
         <name>Empno</name>
         <value>#{pageFlowScope.Empno}</value>
         <class>java.lang.String</class>
       </input-parameter-definition>
       ...
    </task-flow-definition>
    
    Note that the name of the input parameter (i.e., "Empno") needs to be the same as the parameter name defined on the task flow call activity. When parameter is available, ADF will place it in:
    #{pageFlowScope.Empno}
    to be used within sub-flow. However, this pageFlowScope is different from the one defined in the Task Flow Call activity because they have different owning task flow (i.e., parent task flow vs. sub-flow).
    Here is the definition of sub-flow:
    In the sample implementation, we chose to implement the initialization step in the sub-flow. Empno is passed as an parameter to sub-flow and used to initialize parent state. When sub-flow is launched, default view activity (i.e., ToChildPF) displays. Before it renders, initPage method on the ChildBean will be executed first. The page definition of the default page is defined as follows:
    <pageDefinition xmlns="http://xmlns.oracle.com/adfm/uimodel">
     <parameters/>
     <executables>
       ...
       <invokeAction id="initPageId" Binds="initPage" Refresh="always"/>
     </executables>
     <bindings>
       ...
       <methodAction id="initPage" InstanceName="ChildSFBean.dataProvider"
                     DataControl="ChildSFBean" RequiresUpdateModel="true"
                     Action="invokeMethod" MethodName="initPage"
                     IsViewObjectMethod="false"
                     ReturnName="ChildSFBean.methodResults.initPage_ChildSFBean_dataProvider_initPage_result"/>
        ...
     </bindings>
    </pageDefinition>
    
    
    As shown above, initPage is specified in the executables tag and will be invoked when the page is refreshed. initPage method itself is defined as follows:

    public void initPage()
    {
       FacesContext facesContext = FacesContext.getCurrentInstance();
       ExpressionFactory exp = facesContext.getApplication().getExpressionFactory();
       DCBindingContainer bindingContainer =
         (DCBindingContainer)exp.createValueExpression(
             facesContext.getELContext(),"#{bindings}",DCBindingContainer.class).getValue(facesContext.getELContext());
       ApplicationModule am = bindingContainer.getDataControl().getApplicationModule();
    
       ViewObject vo = am.findViewObject("ComplexSFEmpVO");
       vo.executeQuery();
    
       Map map = AdfFacesContext.getCurrentInstance().getPageFlowScope();
       if(map !=null){
            Object empObj = map.get("Empno");
            if(empObj instanceof Integer){
                Integer empno =(Integer)map.get("Empno");// new Integer(empnoStr);
                Object[] obj = {empno};
                Key key = new Key(obj);
                Row row = vo.getRow(key);
                vo.setCurrentRow(row);
            }
            else
            {
                String empnoStr = (String)map.get("Empno");
                Integer empno = new Integer(empnoStr);
                Object[] obj = {empno};
                Key key = new Key(obj);
                Row row = vo.getRow(key);
                vo.setCurrentRow(row);
            }
        }
    }
    In initPage, it takes input parameter Empno (i.e., from #{pageFlowScope.Empno}) as a key to select a row and set it to be the current row in the master table (i.e., Employee table).
    References
    1. Oracle® Fusion Applications Developer's Guide 11g Release 1 (11.1.1.5)
    2. openSubTask and closeSubTask APIs
    3. Oracle ADF Task Flow in a Nutshell

    Thursday, September 22, 2011

    Book Review: "Oracle WebCenter 11g PS3 Administration Cookbook"

    There are three major components in the WebCenter product stack:
    1. WebCenter Framework
      • Allows you to embed portlets, ADF Taskflows, content, and customizable components to create your WebCenter Portal application
      • All Framework pieces are integrated into the Oracle JDeveloper IDE, providing access to these resources as you build your applications
    2. WebCenter Services
      • Are a set of independently deployable collaboration services
      • Incorporates Web 2.0 components such as content, collaboration, discussion, announcement and communication services
    3. WebCenter Spaces
      • Is an out-of-the-box WebCenter Portal application for team collaboration and enterprise social networking
      • Is built using the WebCenter Framework, WebCenter services, and Oracle Composer
    As the strategic portal product of Oracle, WebCenter Framework plays in the Enterprise portal space, and WebCenter Services/Spaces plays in the Collaboration Workspace space.

    What's Portal Application?


    A portal can be thought of as an aggregator of content and applications or a single point of entry to a user's set of tools and applications. It is a web-based application that is customizable by the end-user both in the look and feel of the portal and in the available content and applications which the portal contains.

    The key elements of portals include:
    • Page hierarchy
    • Navigation
    • Delegated administration and other security features
    • Runtime customization and personalization.

    To design a successful enterprise web portal is hard, but getting easier and more practical with Oracle WebCenter which is built on top of Oracle ADF technology. As an enterprise portal, security is extremely important. Unauthorized people should never get access, and different groups may have different permissions. Customers, partners and employees should be able to use a single login to access all relevant information and applications.

    The Book


    To design, test, deploy, and maintain a successful web portal is nontrivial to say the least. Therefore, a cookbook like Oracle WebCenter 11g PS3 Administration Cookbook is needed. In fourteen chapters, it provides over a hundred step-by-step recipes that help the reader through a wide variety of tasks ranging from portal and portlet creation to securing, supporting, managing, and administering Oracle WebCenter.

    In the book, it covers many new features introduced by the 11g R1 Patch Set 3 version of the Oracle WebCenter product. It also touches upon all three components: WebCenter Framework, WebCenter Services, and WebCenter Spaces and roughly in that order. Besides important topics such as customization and security , it also discuss the analytics aspect of the product (i.e., Activity Graph).

    Resource Catalog

    Using resource catalog as an example, in this book, you'll learn that:
    • How to create a resource catalog either at design time or runtime
    • How to specify a catalog filter or a catalog selector
    • How to add a link to the resource catalog
    • How to add an existing resource catalog to the catalog
    • How to add custom components to a resource catalog
    • How to add custom folder to the resource catalog
    At each step, you'll learn how it works and why. For example, when you add a resource catalog at runtime, an XML file will also be created, but it will be stored in the MDS (Metadata Service Repository) which is a repository used by WebCenter to store metadata.

    Trade-offs


    After the introduction of different approaches, the author also discusses the trade-offs of each approach. For example, with WebCenter Spaces, it allows you to build collaborative intranets without needing to develop a lot. The problem you will be having with WebCenter Spaces is that it is not as easily customizable as a regular WebCenter Portal application. Therefore, you can combine the best of both worlds. When you need a high level of customization or you need to extend the site with your custom functionality, then you should create a WebCenter Portal application. When you need a collaborative environment where customization or added functionality is not as important as the collaborative services, then go for WebCenter Spaces.

    References
    1. Oracle WebCenter 11g PS3 Administration Cookbook
    2. Creating a Successful Web Portal
    3. Oralce WebCenter (Wikipedia)
    4. Oracle ADF Task Flow in a Nutshell
    5. Book Review: Web 2.0 Solutions with Oracle WebCenter 11g
    6. Oracle® Fusion Middleware Enterprise Deployment Guide for Oracle WebCenter Content 11g Release 1 (11.1.1)

    Sunday, August 14, 2011

    Book Review: "Overview of Oracle Enterprise Manager Grid Control 11g R1: Business Service Management"

    There are different console applications or flavors provided in Oracle Enterprise Manager (OEM):
    • OEM Database Control
    • OEM Application Server and Fusion Middleware Control
    • OEM Grid Control
    The Business Service Management (BSM) capabilities of Oracle Enterprise Manager are available only in the Grid Control flavor.

    In this book "Overview of Oracle Enterprise Manager Grid Control 11g R1: Business Service Management", it covers OEM's Business Service Management capabilities in great details as described in this article.

    Business Service Management

    Business Service Management (BSM) is a methodology for monitoring and measuring Information Technology (IT) services from a business perspective. It allows IT departments to operate by service rather than by individual manageable entity or target.

    BSM software and services are provided by major vendors. Oracle Enterprise Manager (OEM) 11g is a product offering from Oracle that provides solutions to the typical IT infrastructure management issues.

    Management Issues

    Any enterprise IT infrastructure contains numerous disparate components that are geographically distributed across various data centers. These components include:
    • Hardware components
      • Such as servers hosting different applications, network switches, routers, storage devices, and so on
    • Software components
      • Such as operating systems, database servers, application servers, middleware components, packaged applications, distributed applications, and so on
    To make things even worse, an IT infrastructure also have the following characteristics:
    • Hardware and software could be sourced from multiple vendors
    • Multiple versions of the same software product, from the same vendor, could be deployed across the enterprise
    • Newer technologies such as service-oriented architectures (SOA), virtualization, cloud computing, portal frameworks, grid architectures, and mashups within an organizations make troubleshooting and monitoring of business services very difficult
    These heterogeneous, disparate and geographically distributed components give rise to the complexity of IT management issues.

    The Needs

    Facing these challenges, a successful management solution must:
    • Have the capability to model, monitor, administer, and configure higher-level logical entities that map to business functions
    • Provide different perspectives to get a comprehensive view of the health of the various business services and the underlying IT infrastructure
    • Be able to perform complex computations and scale very easily with a simple architecture and a small footprint
    • Take into consideration the geographical spread of the infrastructure landscape

    The Solution

    Oracle Enterprise Manager (OEM) is one of the industry leaders in the system management products arena. It provides the following capabilities:
    • A single unified platform for modeling and managing enterprise data centers
    • Comprehensive monitoring and management capabilities for the entire Oracle Grid within the enterprise
    • Discovery, monitoring, and management of various pieces of the IT infrastructure
      • Includes Non-Oracle Software Products
    • Supports both passive and active monitoring paradigms
    • Two distinct perspectives:
      • Target-based focus
        • This provides a highly specialized set of views exclusive for a specific target
      • Business service-based focus
        • This provides a holistic view that dwells on different targets within an enterprise and their interactions with each other to achieve a business objective
    • Capabilities of defining and tracking Service-Level Agreements (SLAs) of different business functions
    The Grid Control architecture (see the Figure above) is distributed in nature and relies on the agents to collect data on the individual hosts. It includes the following components:
    • Oracle Management Agent
      • A piece of software installed on a host that collects information about the targets on the host or remote hosts. The collected data is then passed onto the management service.
      • In case of remote monitoring (vs. local monitoring), there is no automatic discovery support and the administrator must use the console UI pages to initiate the remote discovery.
    • Oracle Management Service (OMS)
      • This is the brain of the OEM. It acts as the centralized management solution and also acts as the server to which all the management agents upload the collected data.
      • The OMS provides current and future insights into business functions and services by looking at the historical data that is stored in its management repository.
    • OEM Console
      • This is the user interface that exposes all the management functionalities to the end user of OEM.
      • It provides views into each of the targets and also allows the user to initiate actions and configuration changes on these targets.
    • Oracle Management Repository
      • This is the central repository that is used by the OMS to store all data.
    By distributing the data collection to individual agents the Oracle Management Service (OMS) is freed up to perform more important tasks.

    The Book

    In the book, it has used a travel portal as example to:
    • Illustrate the concepts of IT infrastructure management
    • Showcase OEM's BSM capabilities
    • Provide step-by-step instructions of using OEM
    The travel portal provides various business services such as flight search, car rental services, and so on to the end users. It also consumes the payment gateway services from various business partners.

    In the travel portal illustration, these services are configured as different service targets such as:
    • CarRentalService:
      • Modeled as a Generic Service target based on the TravelPortal-CarRental-System
    • FlightSearchWebSite:
      • Modeled as a Web Application service based on a Service Test from two different beacons
    • PaymentGatewayService:
      • Modeled as a Forms Application based on the PaymentGatewaySystem
    • TravelPortalSearchServices:
      • Modeled as an Aggregate Service comprising the CarRentalService and FlightSearchWebSite service targets

    Resources

    1. Overview of Oracle Enterprise Manager Grid Control 11g R1: Business Service Management
    2. Oracle Grid Products
    3. Oracle Grid Engine
    4. Oracle Enterprise Manager
    5. Enterprise Manager Grid Control
    6. Oracle Enterprise Manager Cloud Control 12c: Best Practices for Middleware Management

    © Travel for Life Guide. All Rights Reserved.

    Analytical Insights on Health, Culture, and Security.