Friday, July 18, 2014

NetBeans: Configuring NetBeans IDE for C/C++

In this article, we will demonstrate how to install NetBeans IDE 8.0 and configure it for C/C++.

Installation steps:
  1. NetBeans IDE 8.0
  2. C/C++ plugin module
  3. Compiler and Tools


    NetBeans IDE


    From [1], you can choose which bundle (based on supported technologies) to download.  The choices include:
    •  Java SE
    •  Java EE
    •  C/C++
    •  HTML5 & PHP
    •  All
    If you have downloaded either "C/C++" or "All" bundle, C/C++ plugin module (see next section) is already included.

    C/C++ plugin module


    The NetBeans IDE is a dynamic modular IDE, which means you can change it by adding and removing modules of the program. You can add functionality by installing plugin modules, or remove functionality by uninstalling plugin modules.

    If your NetBeans IDE does not show a C/C++ project category when you select File > New Project, complete the following steps to add the C/C++ plugin module to the IDE.[2]
    1. If your network uses a proxy, choose Tools > Options > General in the IDE, select Manual Proxy Settings, enter the HTTP Proxy and Port for your proxy, and click OK.
    2. Choose Tools > Plugins.
    3. In the Plugins dialog box, click the Available Plugins tab, and scroll to the C/C++ category.
    4. Select the C/C++ checkbox and click Install to start the NetBeans IDE Installer.
    5. In the NetBeans IDE Installer, click Next.
    6. Read the license agreement, select the checkbox to accept the terms of the license agreement, and click Next.
    7. Click Install.
    8. After the installation completes, select either Restart IDE Now or Restart IDE Later and click Finish.

    Compiler and Tools


    The Netbeans C/C++ module requires a C compiler, C++ compiler, make utility, and gdb debugger. See [3] on the instructions for the platform of your development system.  Here we will use Micorsoft Windows as our platform and use the tools provided in cygwin for the demonstration.

    The NetBeans C/C++ module has been tested with the following compilers and tools from Cygwin.com.  However, if your version is newer, it seems to work fine too.


    Software or ResourceVersion TestedDescription
    cygwin1.dll1.7.7, 1.7.9 Cygwin Linux-like environment for Windows
    gcc4.3.4Cygwin C compiler
    g++4.3.4Cygwin C++ compiler
    gdb6.8Cygwin GNU debugger
    make3.81Cygwin make utility


    To download the compiler and tools you needed for C/C++ plugin, you can go to [4] and select one of the mirror sites.


    Note that you could select the appropriate package to download by specifying your compiler name or tool name.  If you select all packages to download, it will take hours.

    In the figure, we have specified g++ in the Search field.  Cygwin Setup was able to identify which package containing the interested product.  For example, we have selected GNU Complier for the download.

    After you have downloaded all packages that are needed for the C/C++ plugin module.  You should follow the instructions in [2] to configure it.  If you didn't set them up correctly, you will run into this "No Compiler" error.


    Then just follow the provided instructions to fix the issue.  For example, here is the tool collection we have in the environment:


    As you can see, most of our tools are provided from the cygwin64 installation.  But, you don't need to specify everything out of your cygwin64 installation.  For example, we have chosen make.exe out of our MKS Toolkit installation (see [5]).

    References

    1. Download NetBeans IDE
    2. Configuring NetBeans IDE 8.0 for C/C++/Fortran
    3. Installing and Setting Up the Compilers and Tools
    4. cygwin.com
    5. Tool Collection Notes
      • Dependency checking requires support from your tool collection (make and compilers). 
        • It has been tested with the Oracle Solaris Studio tool collection and GNU tool collections including Cygwin and MinGW. 
        • Dependency checking works when Oracle Solaris Studio compilers are used together with Oracle Solaris make and when GNU compilers are used with GNU gmake. Mixing Oracle Solaris make with GNU compilers and vice versa is not supported. 
    6. NetBeans Community Day at JavaOne 2014
    7. Netbeans: Is it possible to install mulltiple Netbeans for each different development need?
    8. NetBeans IDE 8.1 Download
      • With installation of NetBeans 8.1, I need to change "Make Command" to use:
        • C:\cygwin64\bin\bin\make.exe
    9. Eclipse CDT: Symbol 'cout' could not be resolved
      • To resolve this issue in NetBeans, select Project Properties -> Build -> C++ Compiler -> Additional Options and add Use -std=c++11.
    10. NetBeans invalid jdkhome specified fix
      • Navigate to your NetBeans installation folder which by default should beC:\Program Files\NetBeans and look for the folder etc. Inside that folder should be a file with the name netbeans.conf. What you need to do is to open the file with your favorite text reader (notepad as an example) and look for the line that starts with netbeans_jdkhome=.

    C++: Polymorphism Example with Declarations and Definitions Separated

    If you use Eclipse CDT[1] to develop C++ programs, you will get both .cpp and .h files when you create a new class.  Taking "Virtual Member" example from [2], we demonstrate what it will look like after separating declarations from definitions.


    Monolithic Module


    On the Internet, most of examples are given similar to the one below.  It's OK to put everything in one file and test it in a student's project.  More realistically, all large applications are modularized.  In C++ programming, you should separate objects into modules and object's declarations and definitions into header and cpp files.

    // virtual members
    #include <iostream>
    using namespace std;
    
    class Polygon {
      protected:
        int width, height;
      public:
        void set_values (int a, int b)
          { width=a; height=b; }
        virtual int area ()
          { return 0; }
    };
    
    class Rectangle: public Polygon {
      public:
        int area ()
          { return width * height; }
    };
    
    class Triangle: public Polygon {
      public:
        int area ()
          { return (width * height / 2); }
    };
    
    int main () {
      Rectangle rect;
      Triangle trgl;
      Polygon poly;
      Polygon * ppoly1 = &rect;
      Polygon * ppoly2 = &trgl;
      Polygon * ppoly3 = &poly;
      ppoly1->set_values (4,5);
      ppoly2->set_values (4,5);
      ppoly3->set_values (4,5);
      cout << ppoly1->area() << '\n';
      cout << ppoly2->area() << '\n';
      cout << ppoly3->area() << '\n';
      return 0;
    }

    One Definition Rule (ODR)


    Someone has posted this question on Stackoverflow:
    Is is a good practice to put the declaration of C++ classes into the header file?
    Here is the answer:[3]
    C++'s compilation model dates back to the days of C, and so its method of importing data from one source file into another is comparatively primitive. The #include directive literally copies the contents of the file you're including into the source file, then treats the result as though it was the file you had written all along. You need to be careful about this because of a C++ policy called the one definition rule (ODR) which states, unsurprisingly, that every function and class should have at most one definition. This means that if you declare a class somewhere, all of that class's member functions should be either not defined at all or defined exactly once in exactly one file. There are some exceptions (I'll get to them in a minute), but for now just treat this rule as if it's a hard-and-fast, no-exceptions rule. 
    When you separate an object's declarations from its definitions, here is what will be generated by CDT in the header file:

    
    #ifndef POLYGON_H_
    #define POLYGON_H_
    
    class Polygon {
      <snipped>
      ...
    };
    
    #endif /* POLYGON_H_ */

    Using the above convention, you can safeguard your codes to include any declaration only once directly or indirectly.

    Sample Codes


    Without much ado, here are the sample codes after the modularization and the separation of declarations and definitions:

    Polygon.h

    
    #ifndef POLYGON_H_
    #define POLYGON_H_
    
    class Polygon {
    protected:
        int width, height;
    public:
     Polygon();
     virtual ~Polygon();
     void set_values (int a, int b);
     virtual int area ();
    };
    
    #endif /* POLYGON_H_ */

    Polygon.cpp

    
    #include "Polygon.h"
    
    Polygon::Polygon() {
      // TODO Auto-generated constructor stub
    
    }
    
    Polygon::~Polygon() {
      // TODO Auto-generated destructor stub
    }
    
    
    void Polygon::set_values (int a, int b) {
      width=a; height=b; 
    }
    
    int Polygon::area (){ 
      return 0; 
    }

    Rectangle.h

    
    #ifndef RECTANGLE_H_
    #define RECTANGLE_H_
    
    #include "Polygon.h"
    
    class Rectangle: public Polygon {
    public:
     Rectangle();
     virtual ~Rectangle();
     virtual int area ();
    };
    
    #endif /* RECTANGLE_H_ */
     

    Rectangle.cpp

    
    #include "Rectangle.h"
    
    Rectangle::Rectangle() {
      // TODO Auto-generated constructor stub
    
    }
    
    Rectangle::~Rectangle() {
      // TODO Auto-generated destructor stub
    }
    
    int Rectangle::area ()  { 
      return width * height; 
    }
     

    Triangle.h

    
    #ifndef TRIANGLE_H_
    #define TRIANGLE_H_
    
    #include "Polygon.h"
    
    class Triangle: public Polygon {
    public:
     Triangle();
     virtual ~Triangle();
     virtual int area ();
    };
    
    #endif /* TRIANGLE_H_ */
     

    Triangle.cpp

    
    #include "Triangle.h"
    
    Triangle::Triangle() {
      // TODO Auto-generated constructor stub
    
    }
    
    Triangle::~Triangle() {
      // TODO Auto-generated destructor stub
    }
    
    int Triangle::area(){
      return (height * width / 2);
    }
      

    VirtualMember.cpp


    // virtual members
    #include
    #include "Polygon.h"
    #include "Rectangle.h"
    #include "Triangle.h"

    using namespace std;

    class VirtualMember {
        // TODO Auto-generated constructor stub

    };


    int main () {
      Rectangle rect;
      Triangle trgl;
      Polygon poly;
      Polygon * ppoly1 = &rect;
      Polygon * ppoly2 = &trgl;
      Polygon * ppoly3 = &poly;
      ppoly1->set_values (4,5);
      ppoly2->set_values (4,5);
      ppoly3->set_values (4,5);
      cout << ppoly1->area() << '\n';
      cout << ppoly2->area() << '\n';
      cout << ppoly3->area() << '\n';
      return 0;
    }


    References

      1. Eclipse CDT
      2. Polymorphism in C++ 
      3. Is is a good practice to put the declaration of C++ classes into the header file? 

      Monday, July 7, 2014

      OATS: How to Create a Scenario for Oracle Load Testing

      This article is one of the Oracle Application Test Suite (OATS)[1] series published on Xml and More, which includes the following:
      In this article, we will show how to create scenarios for Oracle Load Testing (OLT).


      Oracle Load Testing


      What is Oracle Load Testing?   Oracle Load Testing is a component of OATS, the centerpiece of the Oracle Enterprise Manager solution for comprehensive testing of Web applications.  It allows you to validate the performance and scalability of your Web applications. It can simulate hundreds of virtual users accessing the application simultaneously and measures the effect of the load on application performance.  Oracle Load Testing's virtual users can generate multithreaded browser requests while performing rigorous functional validation under load conditions.

      Here is the typical workflow. For the sake of understanding, assume that script is created on machine A and OLT is on machine B.  In [2], we have shown how to export and import scripts to OLT.  Here we will show how to create scenarios using imported scripts for OLT.

      Scenario


      What is a scenarioScenario in OLT is an entity for configuring and simimulating virutal users.  Once you have defined a scenario and set the profile parameters, you submit the scenario to the Oracle Load Testing Autopilot. There are two ways to submit Scenarios to Autopilot:
      1. Submit without Starting the Scenario
        • This allows you to specify the start and stop times for running the scenario profiles.
      2. Submit and Start the Scenario
        • OLT automatically opens the Autopilot tab with the scenario loaded.
      To submit a Scenario and start the scenario (i.e., 2nd approach), you can click on the "Submit and start test" button (see below).  Here we will focus only on the 1st approach.  After saving parameters to a scenario, later you can start it from a command line.


      To add Profiles to a Scenario, you click the Scenario Detail button to display the Edit Scenario Details dialog box.


      The most important parameters are shown at the top-level of Build Scenarios tab.  For example, we have configured 200 virtual users, selected "Recorded/Random" for Think Time, and chose "OLT Server" (default) to run the virtual users.  Since we have added "Random" modifier in the Think Time, we need to go down to the detail-level to specify the lower and upper limits (i.e., 15% to 185% of the original recorded time).


      Set up Autopilot


      As mentioned before, we are taking the 1st approach to save settings to a scenario and sumbit it to Autopilot for future running.  In this case, we need to set up the parameters of autopilot by selecting the "Set up Autopilot" tab.


      Here you can specify how virtual users will be ramped up and when to start or stop the load test.  In our case, we didn't use OLT ServerStats and it was not set up here. 

      ServerStats lets you monitor a variety of server-side application, database, system, and Web server statistics. You can configure OLT ServerStats to display real-time performance statistics for the various hosts and services available from the server, such as percentage of CPU usage, memory usage, Web server statistics, etc.

      Running Scenarios from the Command Line


      You can run and stop scenario files using the command line Java file OLTCommandLine.jar located in the /lib directory under the installation directory. Use the following command syntax to start a scenario:

      cd ${OATS_HOME}/lib
      OLTCommandLine.jar -run -session=sessionName 
        -scenarioFile=${OLT_SCENARIO_DIR}/scenarioFile.scn 
        -OLTServer=hostName:portnumber
        -user=username -password=password [-log=logfilename]

      Use the following command syntax to stop a scenario:

      cd ${OATS_HOME}/lib
      
      OLTCommandLine.jar -stop -session=sessionName -OLTServer=hostName:portnumber 
      -user=username -password=password

      The following are the command parameters:
      • run
        • Executes the selected scenario until the stop command is issued or the stop conditions specified in the scenario are reached.
      • session
        • Specifies the name to use for the session. If you do not do not provide a session name, Oracle Load Testing generates a session name.
      • scenarioFile
        • The scenario file to load. Specify the full path and file name of the scenario file. Scenario files have a .scn extension.
      • stop
        • Shuts down the specified session.
        • The Stop command is not required if the specified Scenario being run has a Stop condition of some defined time or number of iterations saved in the Autopilot settings.
        • You can not use both "-Run" and "-Stop" in the same command.
      • session
        • Specify the session to be shut down. The session name is automatically generated when you run the scenario. You can get the session name from the console or the log file specified with the scenario run command line parameters.
      • OLTServer
        • Specify the Weblogic server name which hosts OLT. The port number is required.
      • user
        • Specify the admin user name of the Weblogic server. The default username is "oats".
      • password
        • Specify the admin user password of the Weblogic server.
      • log
        • (Optional) Redirects console output to logfilename.
        • Specify the path and file name to use for the log file.

      References

      1. Oracle Application Testing Suite (OATS)
      2. OATS: How to Export and Import Scripts from Windows to Linux

      Wednesday, July 2, 2014

      WebLogic: More on Default Authentication Provider

      You can read this companion article[1] on WebLogic's authentication providers. In this article, we will discuss what the default authentication provide is and how it is different from others.

      Embedded LDAP Provider


      WebLogic Server includes an embedded LDAP server that acts as the default security provider data store for the Default Authentication, Authorization, Credential Mapping, and Role Mapping providers. The performance of the embedded LDAP server is best with fewer than 10,000 users.[2] If you have more users, consider using a different LDAP server and Authentication provider.

      The embedded LDAP server in WebLogic Server contains user, group, group membership, security role, security policy, and credential map information. By default, each WebLogic Server domain has an embedded LDAP server configured with the default values set for each attribute. The WebLogic Authentication, Authorization, Credential Mapping, and Role Mapping providers use the embedded LDAP server as their database. If you use any of these providers in a new security realm, you may want to change the default values for the embedded LDAP server to optimize its use in your environment.

      WebLogic Authentication Provider


      The WebLogic Authentication provider, also known as the DefaultAuthenticator, accesses user and group information in WebLogic Server's embedded LDAP server. In the next section, we will discuss what's the difference between this provider and other 3rd-party providers.

      Difference: Creating Users from Admin Console


      When using the WebLogic Server Administration Console, or WLST,[9] you can create users[7] only in the following databases:
      • The embedded LDAP server, configured with the WebLogic Authentication provider (DefaultAuthenticator)
      • An RDBMS system that is configured with a valid SQL Authentication provider.
      To create users in other identity stores — for example, any external LDAP server (i.e., OpenLDAP)[8] — you must use the tools available with those stores. In addition, if you customize the default security configuration to use a custom Authentication provider, you must use the administration tools supplied by that security provider to create a user. If you are upgrading to the WebLogic Authentication provider, you can load existing users and groups into the embedded LDAP server. For more information, see Migrating Security Data.

      Summary


      The embedded LDAP provider is unique in this way—it is managed via MBeans that are specific to WebLogic and the default LDAP server. The WebLogic Server Administration Console doesn't provide an MBean administrative layer for 3rd-party providers. For example, if you have installed openLDAP as the new authenticator provider and click on New to add users, you will get only the option of DefaultAuthenticator in the drop-down list. In other words, to create new users for other providers, you need to use the tools available with those stores.[3,9]

      References

      1. Understanding Authentication Security Providers in Oracle WebLogic
      2. Managing the Embedded LDAP Server
      3. LDAP Data Interchange Files (LDIF)
      4. Oracle WebLogic Server Administration Console
      5. Configuring Authentication Providers
      6. Manage Users and Groups
      7. Create Users
      8. OpenLDAP
      9. Migrating Data with WLST
      10. WebLogic Server 12c and WebLogic Server 11g Releases (OTN)

      OATS: How to Export and Import Scripts from Windows to Linux

      This article is one of the Oracle Application Test Suite (OATS)[1] series published on Xml and More, which includes the following:
      In this article, we will show how to create scripts in OpenScript (running on Windows only) and use it in OLT[2] running on Linux.

      Export Scripts


      In [3], we have shown how to create load testing scripts using OpenScript.  However, our Oracle Load Testing (OLT) will be run from Linux systems. So, we need to export script, copy it to Linux, and import it to OLT.

      To export the script, you select File tab and Export Scripts... 


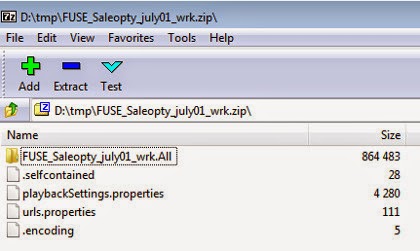
      All the exported files are essentially zip files and can be opened with any unzip tool.  For example, here is the script named FUSE_Saleopty_july_1_wrk.zip we have exported.  Within folder FUSE_Saleopty_july_1_wrk.All, there is a subfolder named databanks which hold input data that can be automatically fed into your Web application during Load Testing.[4] Besides folders, the script also holds other script assets.[6]


      Import Scripts


      After copying the load testing script to your Linux system, you can import it to OLT.  To import scripts, select Tools tab and Import... .

      A file-upload wizard allows you to select the script (i.e., zip file) to OLT. Note that we have copied the script to our home directory. You should NOT copy it to the Default repository (i.e. /OFT) which will be the final destination of import.


      When the script is imported into OLT (by default, the destination of import is the Default repository), it renames the file as FUSE_Saleopty_july01_wrk.openScriptZip.  It then unzips the imported script.


      For example, a new folder named FUSE_Saleopty_july01_wrk.All was created in the Default repository:
      • ${OATS_HOME}/OFT
      In the next OATS article, we will show how to create a scenario from the imported load testing script.

      References

      1. Oracle Application Testing Suite (OATS)
      2. Oracle Load Testing (OLT)
      3. How to Create Load Testing Scripts Using OpenScript
      4. How to Configure Scripts to use Databanks in OATS 
      5. Oracle Application Testing Suite (OATS): Few Tips & Tricks
      6. Best approaches to script assets
        • Do not use Absolute Paths when referring to assets or saving assets. Oracle Load Testing does not support absolute paths.
        • OpenScript, Oracle Test Manager, Oracle Load Testing, and all command-line agents should all use the same shared repository names and paths.
        • Do not refer to an asset in another repository by a relative path.
      7. OATS: Tie All Processes Together — from OpenScript to Scenario (Xml and More)