
Java SE Definitons
JDeveloper uses Java SE definitions to describe an installed Java SE environment. This environment can be either a JRE or an SDK.Note that if you are using a JRE, some features may not be available. Every JDeveloper project uses a Java SE definition to determine what version of the Java API to compile and run with.
Changing JDK That IDE Uses
To change JDK that IDE uses, you can do this:- Configuring JDeveloper via the SetJavaHome configuration parameter in the jdev.conf.
JDeveloper creates a Java SE definition for the Java SE environment being used to run JDeveloper. By default, this definition is used by all new projects. However, additional definitions can be created from any available Java SE. These new definitions can be created in either the user libraries or the system libraries. In a multiuser environment, Java SE definitions created in the user libraries are user specific, while ones created in the system libraries are shared by all users.
To create a new Java SE definition, you follow these steps:
Tools > Manage Libraries > Java SE Definition > New
 This will bring up a Create Java SE dialog:
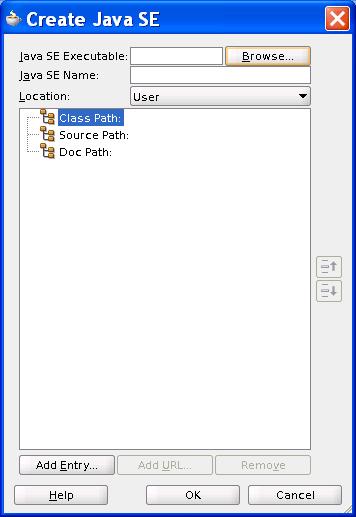 Each Java SE definition encapsulates:
- a Java executable—used for launching programs
- a classpath—containing the classes available within the Java SE environment
- a source path—containing the source files associated with the Java SE classes
- a doc path—containing the Javadoc files for the Java SE classes
Changing JDK That Project Uses
Setting the target Java SE specifies which Java SE JDeveloper will use when compiling and running your project.To view or change the current Java SE for an individual project:
-
In the Application Navigator, select the appropriate project.
-
From the main menu, choose Application > Project Properties, or right-click and choose Project Properties. The Project Properties dialog opens with the common input paths displayed or on the last page that you viewed.
-
On the Libraries and Classpath page the Java SE Version used for the project is displayed. Click Change to define a new Java SE.
- When finished, click OK.

Also Consider...
When you run the Integrated WebLogic[3] for the first time in the JDeveloper, the- .jdeveloper/system11.1.1.x.xx.xx.xx/DefaultDomain/bin/startWebLogic.sh
Finally, JDeveloper enables you to manage libraries and Java SEs outside the project scope too. To learn more, read [4].
No comments:
Post a Comment