 resource ubiquity ./
 content ubiquity chrome/content/
 skin ubiquity skin chrome/skin/
 overlay chrome://browser/content/browser.xul chrome://ubiquity/content/browser.xul
Line 4 (in red) registers an overlay for chrome://browser/content/browser.xul location, allowing you to modify Firefox's main window UI from your overlay XUL file (i.e., chrome://ubiquity/content/browser.xul).
The content of Ubiquity's overlay file looks like this:
<?xml version="1.0"?>
<?xml-stylesheet href="chrome://ubiquity/skin/browser.css" type="text/css"?>

<overlay xmlns="http://www.mozilla.org/keymaster/gatekeeper/there.is.only.xul"
xmlns:svg="http://www.w3.org/2000/svg">
<head></head>
<script type="application/javascript;version=1.7"
src="chrome://ubiquity/content/ubiquity.js"/>
<script type="application/javascript;version=1.7"
src="chrome://ubiquity/content/popupmenu.js"/>
<script type="application/javascript;version=1.7"
src="chrome://ubiquity/content/browser.js"/>
 <popupset id="mainPopupSet">
   <panel id="transparent-msg-panel" class="msgPanel" hidden="true">
     <div id="cmd-panel" xmlns="http://www.w3.org/1999/xhtml"
       xmlns:xul="http://www.mozilla.org/keymaster/gatekeeper/there.is.only.xul">
       <div id="cmd-frame">
         <div id="cmd-entry-container">
           <input id="cmd-entry"/>
         </div>
         <iframe id="cmd-preview"
           src="chrome://ubiquity/content/preview.html"></iframe>
       </div>
     </div>
   </panel>
 </popupset>
 <popup id="contentAreaContextMenu">
   <menuseparator id="ubiquity-separator"/>
   <menu id="ubiquity-menu" label="Ubiquity">
     <menupopup id="ubiquity-menupopup">
     </menupopup>
   </menu>
 </popup>
</overlay>
It specifies two major UI's (i.e., "Context Popup Menu UI" and "Command Entry UI") managed by Ubiquity UI Manager as shown in the diagram below:
 These two UI's are used to support two Ubiquity command input modes:
- Command entry mode
- Context menu mode
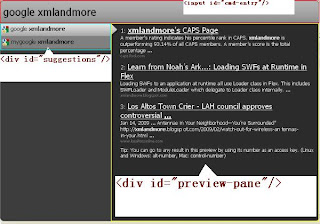
The UI of command entry mode consists of:
- cmd-entry which is an input field
- cmd-preview (an "iframe") which contains ubiquity-preview (a "div") which in turn is composed of
- suggestions (a "div")
- preview-pane (a "div")
- help (a "div")
The layout of it is shown below:
 Note that the look-and-feel of this command panel is determined by the skin you apply to. To modify its skin, you can go to "about:ubiquity" > "Your Skins" to edit or change it. However, there is a known bug on Windows (Mac OS X is o.k.) to prevent it from being changed dynamically now.
It's easy to create a Ubiquity command by yourself if you know JavaScript. Using Ubiquity command editor, you can start creating a new command using the following template:
/* This is a template command. */
CmdUtils.CreateCommand({
name: "example",
icon: "http://example.com/example.png",
homepage: "http://example.com/",
author: {name: "Your Name", email: "you@example.com"},
license: "GPL",
description: "A short description of your command",
help: "How to use your command",
takes: {"input": /.*/},
preview: function(pblock, input) {
pblock.innerHTML = "Your input is " + input.text + ".";
},
execute: function(input) {
displayMessage("You selected: " + input.text);
}
});
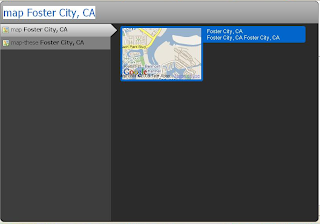
Notice that argument pblock passed to the preview function is the "preview-pane" as described above. You can create any HTML snippet to be placed in there. It can be an image (see figure below), detailed list, or anything you like.


1 comment:
Great website Thanks For Sharing
Blonde girls
Post a Comment