Sunday, March 29, 2009

Ubiquity Command - Dissected

It's easy to create a Ubiquity command by yourself if you know JavaScript. Using Ubiquity command editor, you can start creating new commands such as this:

CmdUtils.CreateCommand({
name: "ses-login-search",
takes: {"adc60019fems or adc60037fems": noun_type_ses_url },
modifiers: {"for": noun_arb_text, "with": noun_arb_text},
homepage: "http://xteam.us.oracle.com/blogs/index.php?blog=10",
author: { name: "Stanley Guan", email: "xmlandmore@gmail.com"},
description: "Search adc60019fems or adc60037fems for keywords" +
" with given userName/password",
help: "Search server for keywords with given credentials." +
" If server name is not specified, default server will be used." +
" Specify credentials with usename and password (in that order) " +
" and separate them by space.",
license: "GPL",
preview: function(pblock, directObj, mods) {
var server = directObj.text createList(sesNicknames);
var keywords = mods["for"].text "keywords";
var creds = mods["with"].text "userName/password";
pblock.innerHTML = "search " + server + " for " + keywords +
" with " + creds;
},
execute: function(directObj, mods) {
// This function gets executed when user hits ENTER.
// You can have different approaches:
// 1. Launch a new window to display command output.
// 2. Replace selection with command output.
}
});

In the above example, new command is named "ses-login-search" and it takes one direct object and two modifiers. This means that our command should look like this:

ses-login-search (adc60019fems or adc60037fems) for (keywords)
with (username/password)

Ubiquity command parser supports natural language processing. You can choose verbs as your command names. Now it only supports single-word command names. So, you should use "-" to connect multiple words as we've done here. Our command will allow SES users to login and search at the same time. The direct object of our command is a server name. It can be either "adc60019fems" or "adc60037fems".

To pass more arguments, you can use modifiers. Modifiers are prepositional phrases (i.e., prepositions followed by nouns in English). In our case, we use "for" to specify keywords to be searched for and "with" to provide user's credentials.

Other parts of command include the following properties:
  • homepage
  • author
  • description
  • help

These properties are used to compose detailed description of our command on Ubiquity's command list. If our command were subscribed, it could look like this:


Help text provided in "help" property is also displayed in the preview pane when user type "help ses-login-search" in the command entry field as shown below:
As described in Ubiquity's UI Design , preview function is used by command designer to provide preview content (as defined by HTML snippet) to be displayed in the preview pane. For example, if your command is a search command, you can display top-ranked search results here for the user to see. Sometimes, if users find the result they need in the preview pane, they can click on the link and jump directly to the target URL and skip the command execution phase.

If users need to see the full command output, they can execute command (defined by the "execute" property) by hitting ENTER after command is fully specified. Two arguments are passed to "execute" function:

  1. directObj (i.e., direct-object)
  2. mods (i.e., modifiers)

They contain the command options as specified by the users. To access them, you use:

  1. directObj.text for direct-object
  2. mods["with"].text or mods["for"].text for modifiers

As I say, it's easy to create a new Ubiquity command if you know JavaScript. Hopefully, this post has provided enough information for you to begin with. To view more examples, you can find them from:
  1. Commands in the wild
  2. Ubiquity Herd

Tuesday, March 24, 2009

Ubiquity's UI Design

At the root folder where Ubiquity Extension is installed, there is a chrome manifest file named chrome.manifest. The content of it looks like this:

resource ubiquity ./
content ubiquity chrome/content/
skin ubiquity skin chrome/skin/
overlay chrome://browser/content/browser.xul chrome://ubiquity/content/browser.xul

Line 4 (in red) registers an overlay for chrome://browser/content/browser.xul location, allowing you to modify Firefox's main window UI from your overlay XUL file (i.e., chrome://ubiquity/content/browser.xul).

The content of Ubiquity's overlay file looks like this:

<?xml version="1.0"?>
<?xml-stylesheet href="chrome://ubiquity/skin/browser.css" type="text/css"?>

<overlay xmlns="http://www.mozilla.org/keymaster/gatekeeper/there.is.only.xul"
xmlns:svg="http://www.w3.org/2000/svg">
<head></head>
<script type="application/javascript;version=1.7"
src="chrome://ubiquity/content/ubiquity.js"/>
<script type="application/javascript;version=1.7"
src="chrome://ubiquity/content/popupmenu.js"/>
<script type="application/javascript;version=1.7"
src="chrome://ubiquity/content/browser.js"/>
<popupset id="mainPopupSet">
<panel id="transparent-msg-panel" class="msgPanel" hidden="true">
<div id="cmd-panel" xmlns="http://www.w3.org/1999/xhtml"
xmlns:xul="http://www.mozilla.org/keymaster/gatekeeper/there.is.only.xul">
<div id="cmd-frame">
<div id="cmd-entry-container">
<input id="cmd-entry"/>
</div>
<iframe id="cmd-preview"
src="chrome://ubiquity/content/preview.html"></iframe>
</div>
</div>
</panel>
</popupset>
<popup id="contentAreaContextMenu">
<menuseparator id="ubiquity-separator"/>
<menu id="ubiquity-menu" label="Ubiquity">
<menupopup id="ubiquity-menupopup">
</menupopup>
</menu>
</popup>
</overlay>


It specifies two major UI's (i.e., "Context Popup Menu UI" and "Command Entry UI") managed by Ubiquity UI Manager as shown in the diagram below:

These two UI's are used to support two Ubiquity command input modes:
  1. Command entry mode
  2. Context menu mode
Command entry mode can be entered via hot keys (i.e., "CTRL + SPACE" on Windows and it's changeable from Ubiquity Command Management Page) while context menu mode can be entered via right-mouse click.

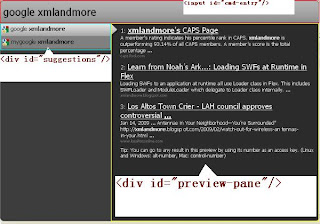
The UI of command entry mode consists of:
  • cmd-entry which is an input field
  • cmd-preview (an "iframe") which contains ubiquity-preview (a "div") which in turn is composed of
    • suggestions (a "div")
    • preview-pane (a "div")
    • help (a "div")

The layout of it is shown below:
Note that the look-and-feel of this command panel is determined by the skin you apply to. To modify its skin, you can go to "about:ubiquity" > "Your Skins" to edit or change it. However, there is a known bug on Windows (Mac OS X is o.k.) to prevent it from being changed dynamically now.

It's easy to create a Ubiquity command by yourself if you know JavaScript. Using Ubiquity command editor, you can start creating a new command using the following template:

/* This is a template command. */
CmdUtils.CreateCommand({
name: "example",
icon: "http://example.com/example.png",
homepage: "http://example.com/",
author: {name: "Your Name", email: "you@example.com"},
license: "GPL",
description: "A short description of your command",
help: "How to use your command",
takes: {"input": /.*/},
preview: function(pblock, input) {
pblock.innerHTML = "Your input is " + input.text + ".";
},
execute: function(input) {
displayMessage("You selected: " + input.text);
}
});

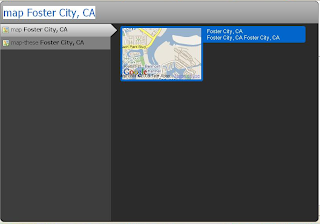
Notice that argument pblock passed to the preview function is the "preview-pane" as described above. You can create any HTML snippet to be placed in there. It can be an image (see figure below), detailed list, or anything you like.

Sunday, March 22, 2009

Ubiquity Extension and Its Preferences

In Firefox, it provides Preferences System for extensions to store data or user preferences. To see all of the currently stored preferences in your Firefox, type 'about:config' into the location bar and press return. For example, here is a list of preferences filtered by the 'ubiquity' keyword:

When Ubiquity extension is installed, it comes with a set of default preferences which is stored in the preferences.js file under "<UB>/defaults/preferences" folder where "<UB>" is the Ubiquity installation location (for example, it's at C:\Documents and Settings\<user>\Application Data\Mozilla\Firefox\Profiles\eid50wk9.default\extensions on Window XP).

The content of preferences.js in Ubiquity 0.2pre19 looks like this :

pref("extensions.ubiquity.language", "en");
pref("extensions.ubiquity.trustedDomains",
"ubiquity.mozilla.com");
pref("extensions.ubiquity.skin", "old");
pref("extensions.ubiquity.standardFeedsUri",
"https://ubiquity.mozilla.com/standard-feeds/");
pref("extensions.ubiquity.enablePageLoadHandlers", true);
pref("extensions.ubiquity.displayAlertOnError", false);
pref("extensions.ubiquity.isResetScheduled", false);
pref("extensions.ubiquity.remoteUriTimeout", 60000);
pref("extensions.ubiquity.bugReportUri",
"https://ubiquity.mozilla.com/report-bug/new/");

Referencing from JavaScript

To reference the Preferences System from within the JavaScript code, first, you need to have a reference to XPCOM service given the ClassID of the Preference Manager service. To do that, you must add the following line of code to your file:
       var prefManager = Components.classes["@mozilla.org/preferences-service;1"]
.getService(Components.interfaces.nsIPrefBranch);

Now that you have access to the preference manager you can get and set preferences using getIntPref()/getBoolPref()/getCharPref() and setIntPref()/setBoolPref()/setCharPref(). For example, to retrieve the default setting of "extensions.ubiquity.language", you use

var lang = prefs.getCharPref("extensions.ubiquity.language");

Ubiquity and Its Configuration Files

Ubiquity is a Firefox extension. To learn more, click here. You can download the latest beta version from here. By clicking on the link, you'll download an .xpi file to your Firefox. The .xpi file (pronounced zippy) is nothing more than a .zip file that has been renamed.

After installtion, a new folder with the following directories:

ubiquity@labs.mozilla.com/
chrome/
chrome/content/
chrome/skin/
defaults/
defaults/preferences/

will be created in C:\Documents and Settings\<user>\Application Data\Mozilla\Firefox\Profiles\eid50wk9.default\extensions folder on Window XP.

Intall Manifest
In the root folder (i.e., ubiquity@labs.mozilla.com/; hereafter will be referred to as "<UB>"), there is an install manifest file named intall.rdf (a plain text file). install.rdf file is used by the Extension Manager when installing an XPI file and when registering an extension at specified location. From it, you can find the following information:

  • version of the extension being installed (i.e., 0.2pre19)
  • versions of Firefox the extension is designed for (i.e., minVersion: 3.0 and maxVersion: 3.2.*)


Chrome Manifest

At the root folder, there is also a chrome manifest file named chrome.manifest. Chrome is the term used to refer to Interface Packages created for Firefox. The Firefox browser contains a component, the Chrome Manager, that handles the installation and loading of the various parts of Firefox. Everything from the guts (global, browser, etc.) to extensions (such as Ubiquity)register themselves with this manager. Chrome manifest file tells Firefox where your chrome files are and what to do with them. The content of chrome.manifest for Ubiquity looks like this:

resource ubiquity ./
content ubiquity chrome/content/
skin ubiquity skin chrome/skin/
overlay chrome://browser/content/browser.xul chrome://ubiquity/content/browser.xul


content

A content package is registered with the line

content packagename uri/to/files/ [flags]

This will register a location to use when resolving the URI chrome://packagename/content/... . The URI may be absolute or relative to the location of the manifest file. Note, that it must end with an '/'. For instance, "chrome://ubiquity/content/editor.html" is mapped to "<UB>/chrome/content/editor.html."

skin
A skin package is registered with the line

skin packagename skinname uri/to/files/ [flags]

This will register a skin package when resolving the URI chrome://packagename/skin/... . The skinname is an opaque string identifying an installed skin. If more than one skin is registered for a package, the chrome registry will select the best-fit skin using the user's preferences. For instance, "chrome://ubiquity/skin/buttons/grad.png" is mapped to "<UB>/chrome/skin/buttons/grad.png."

resource

When using JavaScript code modules it may be necessary to create resource protocol aliases so extensions and applications can load modules using Components.utils.import. Aliases can be created using the resource instruction:

resource aliasname uri/to/files/ [flags]

This will create a mapping for resource://<aliasname>/ URIs to the path given. For instance, "resource://ubiquity/scripts/jquery.js" is mapped to "<UB>/scripts/jquery.js."

overlay

XUL overlays are registered with the following syntax:

overlay chrome://URI-to-be-overlaid chrome://overlay-URI [flags]

Extensions usually modify an application's UI ("chrome") and behavior by providing overlays to already existent windows/documents. Those overlays are a part of the extension's content package (content provider).

References

  1. Chrome Registration
  2. Firefox Extension Development Tutorial :: Configuration Files
  3. Getting started with extension development