
In the production environment, the web application would typically reference a JDBC datasource, since it simplifies maintenance of the connection credentials by allowing them to be centrally managed in the Java EE container. In this article, we will show you how to:
- Switch from JDBC URL to JDBC DataSource in JDeveloper.
- Setup global JDBC DataSource for database connection in the WebLogic Server
- Deploy a Web Application to the WebLogic Server
If you use JDBC URL connection type, you provide settings as shown below:
 However, if you use JDBC DataSource connection type, its settings are done on the server. To avoid passwords being present in plain text in deployed files, JDeveloper uses password indirection, which means that passwords for the data sources must be set on the server before the application will run correctly.
A data source object enables a Java Database Connectivity (JDBC) client to obtain a DBMS connection from a JDBC pool. A data source is a vendor-independent encapsulation of a database server connection. The data source offers advantages over a JDBC URL connection because the data source can be tuned, reconfigured, or remapped without changing the deployed application.
In WebLogic Server, you configure database connectivity by adding data sources to your WebLogic domain. WebLogic JDBC data sources provide database access and database connection management. Each data source contains a pool of database connections that are created when the data source is created and at server startup.
Choosing JDBC DataSource
After you finish testing your application using Integrated WebLogic Server and decide to deploy it to a standalone WebLogic Server, then it's time to configure JDBC DataSource as your application's connection type.
This configuration step is done on the Application Module in the Business Layer.
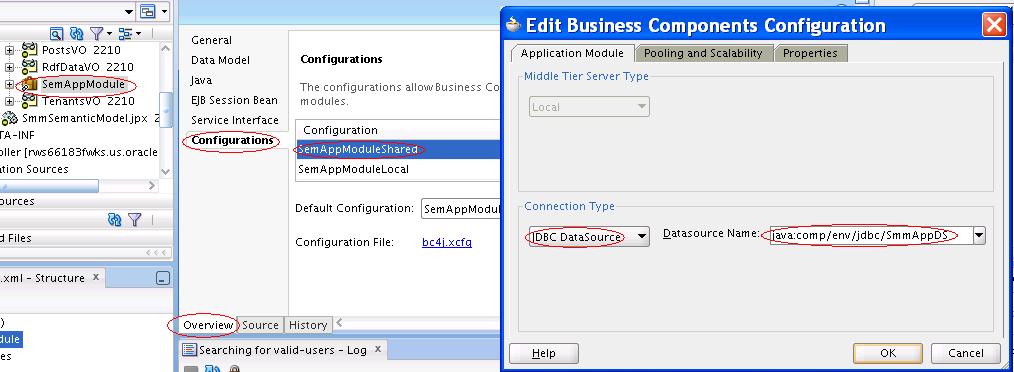 Edit Business Components Configuration dialog is used to create a new application module configuration or edit an existing one. To open it, do:
Application Navigator context menu for application modules > Configurations > Edit > Application Module tabYou choose to connect to a JDBC DataSource from the dropdown list. The JDeveloper helps create the data source name based on available resource connections. This data source naming convention follows the Java EE standard which specifies that resource connections appear in the application-specific name space java:comp/env/jdbc/. For example, for a connection named 'SmmApp', the JDBC Datasource name would be 'java:comp/env/jdbc/SmmAppDS'.
When you deploy the application and run it in standalone Oracle WebLogic Server, the specified data source connection in the application module configuration will be used.
Setting up Global JDBC DataSource
You can create a global data source on Oracle WebLogic Server Administration Console:
- http://xbox.mycompany.com:7001/console/
- Login to the Oracle WebLogic Server Administration Console. Click on the Data Sources link under JDBC. On the Summary of JDBC Data Sources page, click New. In the Create a New JDBC Data Source page, enter details of the data source.
- The name can be anything.
- The JNDI name must be of the form jdbc/connection-nameDS. For example, if the application has a connection name SmmApp, the JNDI name is jdbc/SmmAppDS. Ensure that the database type is Oracle and that the driver is Oracle’s Driver (Thin) for Service Connections;Version 9.0.1,9.2.0,10,11. Click Next twice to navigate to the Create a New JDBC Data Source page, where you enter the connection details.
- The database name is the Oracle SID.
- The host name is the the name of the machine the database is on.
- The default port is 1521.
- Enter the user name and password, for example hr/hr. Click Next and click Test Configuration. Click Next to navigate to the Select Targets page, where you select a target for this data source. If you fail to select a target, the data source is created but not deployed. Click Finish.
Steps to Deploy to WebLogic Server
Application Properties Dialog is used to to define the deployment profiles that will be available to an application. To open Deployment page, do:Application menu > Application Properties > Deployment pageMakre sure "Auto Generate and Synchronize weblogic-jdbc.xml Descriptors During Deployment" is unchecked. When this field is not selected, this means that your deployed application will use global data sources on the server.
 You can also edit the default deployment profile (i.e. SmmTest_application1--EAR File) or create a new one if needed.
There are two options for the deployment:
- Deployed to Ear
- Deployed to Application Server
 You then deploy your application using context menu. Right select your application and select Deploy. Choose the destination to be your application server (i.e., xbox).
References
- Database Connections in JDeveloper 11
- JDBC Datasources Work in the Business Components Browser in 11g
- Configuring JDBC Data Sources
- Configuring JDBC Data Sources (WebLogic)
- What You May Need to Know About JDBC DataSource
- Oracle WebLogic Server Downloads
- Oracle® Fusion Middleware Configuring and Managing JDBC Data Sources for Oracle WebLogic Server 11g Release 1 (10.3.6)


