Cross Column

Showing posts with label ADF Business Component. Show all posts

Saturday, December 18, 2010

How to Create Oracle ADF BC Services (2)

This article is a continued writing from the previous how-to article. Here we will demonstrate how to create an ADF BC service using Create Business Components from Tables wizard.

Step 1: Create a New Fusion Web Application (ADF)

  • Open the New Gallery wizard and choose Fusion Web Application (ADF) [File > New > General > Applications > Fusion Web Application (ADF)]
  • In the Create Fusion Web Application (ADF) wizard, specify your application name (e.g., EmployeeWS2)
    • Specify "oracle.apps" to be your Default Package name
  • Click Finish.

Step 2: Creating a Database Connection[8]

  • Open the Create Database Connection dialog [File > New > General > Connections > Database Connection] .
  • Select Application Resources if it is not selected as the Create Connection In option.
  • Enter a name for the connection, select the connection type, and enter the username and password (use scott/tiger because we're going to use EMP table in SCOTT schema)
  • Click Test Connection to confirm that you can connect.
  • Click OK if the connection was successful.

Step 3: Create Business Components from Tables

When you create an entity object from an existing table, first JDeveloper interrogates the data dictionary to infer the following information: the primary and unique key attributes, the SQL and Java data types of each attribute based on those of the underlying column, etc.
JDeveloper then creates the XML component definition file that represents its declarative settings and saves it in the directory that corresponds to the name of its package. This XML file contains the name of the table, the names and data types of each entity attribute, and the column name for each attribute.
  • In the Application Navigator, select the Model project and launch the Create Business Components from Tables wizard [File > New > Business Tier > ADF Business Components > Business Components from Tables].

  • In the Initialize Business Components Project dialog which opens before the wizard, confirm that the database connection you created is the current selection and click OK.
  • On step 1 of the Create Business Components from Tables wizard, Entity Objects, enter EMP% in Name Filter, click Query to populate the Available list.
  • Select EMP table from the Available list and shuttle it to the Selected list to create default business components based on it. Then click Next.

  • On step 2, Updatable View Objects, select business component, EmpView(Emp), from the Available list and shuttle it to the Selected list. Then click Next.

  • On step 3, Read-Only View Objects, skip it.
  • On step 4, Application Module, click Finish.
    • Each ADFbc service needs to have a backing application module. The view object instances in the application module can be published as SDOs.
  • Click Save All to save your work.

Step 4: Edit the View Object

  • In the Application Navigator, double-click EmpView in the Model project to open it in the view object editor.
  • Select the Attributes tab to display all the attributes in the EmpView view object.
  • In the attributes table, select attribute Empno and edit it. Make it a key by checking Key Attribute.

  • In the attributes table, select attribute RowID and delete it (see previous how-to article for explanation)

  • Click Save All to save your work.

Step 5: Edit the Entity Object

  • In the Application Navigator, double-click Emp entity object in the Model project to open it in the entity object editor.
  • Select the Attributes tab to display all the attributes in the Emp entity object.
  • In the attributes table, select attribute Empno and edit it. Make it a primary key by checking Primary Key.

  • In the attributes table, select attribute RowID and delete it.
  • Click Save All to save your work.

Test the Application in the Business Component Tester

  • In the Application Navigator, right-click AppModuleAM and choose Run.
  • In the Oracle Business Component Browser, double-click EmpView1.
  • Jot down the Empno (i.e., 7369) shown in the diagram. You need this information in the test step below (i.e., step 7)
  • Click '>' icon to navigate to the next record.

Step 6: Publish Application Module as Web Service

  • In the Application Navigator, double-click the AppModule.
  • In the Application Module Editor, select Service Interface tab to open the Service Interface page.
  • In the Service Interface page, select the '+' icon to enable support for service interface.
  • Use the Create Service Interface wizard to configure the options you want.
    • Click twice to skip Step 1 and 2 (we use default settings).
    • On the Service View Instances page, select EmpView1 and shuttle it over to the Selected list, and enable Create, Delete, Update, and GetByKey in the Basic Operations section. Then click Finish.
  • You should be able to see the following files are generated under AppModule ->serviceInterface:
    • AppModuleServiceImpl.java
    • AppModuleService.java
    • AppModuleService.wsdl
    • AppModuleService.xsd

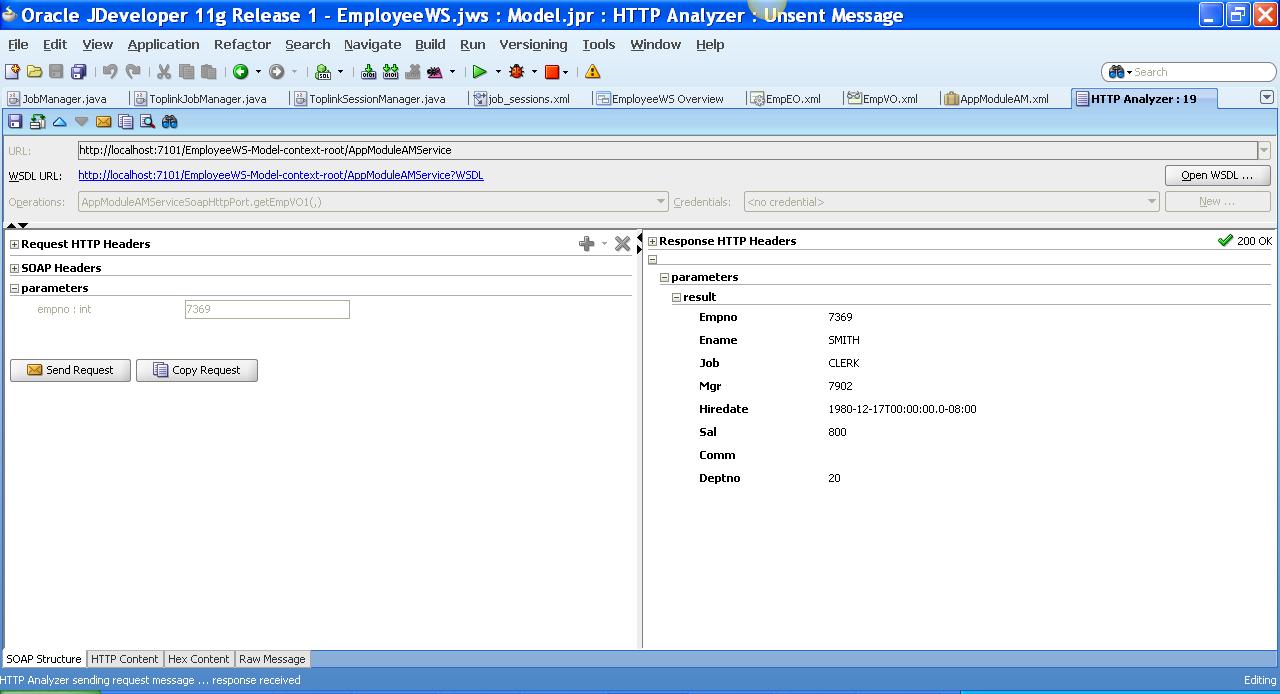
Step 7: Test ADFbc Service

  • In the Application Navigator, right-click the AppModuleServiceImpl.java in the serviceInterface folder and select Run.
  • Select Target URL (i.e., http://localhost:7101/EmployeeWS2-Model-context-root/AppModuleService) in the Running:DefaultServer Log window and click on it.
  • Test ADF BC Service using HTTP Analyzer.

Possible Improvements and Other Use Cases

An application module can expose its standard CRUD methods of view objects to web service clients without requiring any custom Java code. When used without customization, your component is completely defined by its XML component definition and it will be fully functional without custom Java code or even a Java class file for the component. If you have no need to extend the built-in functionality of a component in ADF Business Components, and no need to write any custom code to handle its built-in events, you can use the component in this XML-only fashion. However, sometimes you do need to write custom methods and expose them as service methods. For example, your custom methods can:
  • Configure view object properties to query the correct data to display
  • Iterate over view object rows to return an aggregate calculation
  • Perform any kind of multistep procedural logic with one or more view objects
In the next step, we will show sayHello as our custom method for simplicity.

Customizing an Application Module with Service Methods

To add a custom service method to your application module, you must first enable a custom Java class for it. To generate a Java file for your application module class:
  1. In the Application Navigator, double-click the application module.
  2. In the overview editor, click the Java navigation tab.
  3. On the Java Classes page, click Edit Java Classes (i.e., pencil icon).
  4. In the Select Java Options dialog, select Generate Application Module Class.
  5. Click OK and click Save All button.

To add sayHello service method to Employee Service and publish it to the service interface:
  1. In the Application Navigator, double-click the AppModuleImpl.java.
  2. Add the following code snippets at the bottom of the file:
     public String sayHello(String name) {
    return "Hi " + name;
    }
  3. Click Save to save changes.
  4. In the Application Navigator, double-click the application module.
  5. In the overview editor, click the Service Interface navigation tab.
  6. On the Service Interface page, click Edit Service Interface Custom Methods (i.e. pencil icon).
  7. On the Service Custom Methods dialog, shuttle sayHello(Strig):String from the Available list to the Selected list. Click OK.
  8. Click Save All to save your work.
  9. Use Step 8 above to test it.

Creating Multiple Entity Objects and Associations

To create a single entity object, you can use Create Entity Object wizard. However, if you need to create multiple entity objects and associations from existing tables, you use the Create Business Components from Tables wizard. See Section 4 "Creating a Business Domain Layer Using Entity Objects" in [4] for more details.
The Create Business Components from Tables wizard makes it easy to quickly generate many business components at the same time. In practice, this does not mean that you should use it to immediately create entity objects for every table in your database schema just because it is possible to do so. If your application requires all of the tables, then that strategy might be appropriate. But because you can use the wizard whenever needed, you should create the entity objects for the tables that you know will be involved in the application.
Section 9.4 "Defining Nested Application Modules" in [4] describes a use case-driven design approach for your business services that can assist you in understanding which entity objects are required to support your application's business logic needs. You can always add more entity objects later as necessary.

Generic Application Template

Notice that we've created our application using Fusion Web Application (ADF) template. Two projects have been created for us: Model and ViewController. However, if you don't plan to create UI components using ViewController project, you might be better off using "Generic Application" template.

In this case, you need to select ADF Business Components from the list of available technologies in step 2 of Create Generic Application wizard and shuffle it to the right as shown below:
This will create an application with an empty project preconfgured for you to create your ADF-BC Components and ADF-BC services.
References
  1. ADF Business Components
  2. Open SOA
  3. Oracle Application Development Framework
  4. Oracle Fusion Middleware Fusion Developer's Guide for Oracle Application Development Framework 11g Release 1 (11.1.1)
  5. Oracle JDeveloper
  6. Service Data Objects Home
  7. Web Services Description Language (WSDL) 1.1
  8. Database Connections in JDeveloper 11
  9. Open Source sample applications for Oracle Fusion Middleware technology

How to Create Oracle ADF BC Services

Introduction
The Oracle Application Development Framework (Oracle ADF) is an end-to-end application framework that builds on Java Platform, Enterprise Edition (Java EE) standards and open-source technologies to simplify and accelerate implementing service-oriented applications.
Using Oracle JDeveloper 11g and Oracle ADF framework in tandem, you implement business services and publish them as web services using a declarative, component-based approach that allows you to focus on application-specific business logic instead of low-level application "plumbing" code. In other words, creating, testing, and deploying data-centric web services in Oracle ADF is extremely easy and requires no web services specific knowledge or coding on your part.
Oracle ADF Business Components (BC) will be the main source of data access and business logic in Fusion applications. Using it, service provider can easily develop new remotable services (i.e, ADF BC services). For each exposed view objects used in ADF BC services, we can generate standard Create, Retrieve, Update, and Delete (CRUD) methods. In addition to the standard CRUD methods, custom methods can also be selected to be included in the ADF BC service.
Oracle JDeveloper includes a variety of ways to construct ADF BC services. In this article, we will demonstrate the following approach:
  • Create schema-object-based entity object
This approach starts from creating an entity object with its supporting components (i.e., application module and view object). Then we will expose the auto-generated CRUD methods from view objects as service operations. Using this approach, JDeveloper helps you to construct business components (i.e., application module, entity object, and view object) in one shot.
Every entity object must have at least one attribute marked as a primary key. In our example, EMP table has no primary key constraint. Using our approach, Create Entity Object wizard will allow you to set any attribute as primary key.

ADF Business Components
Oracle ADF Business Components is a framework implements the Business Services layer on top of a data source in a declarative way. It provides out-of-the-box services such as transaction management, resource pooling, locking, declarative validation rules, translation, and object-relational mapping.
To use Oracle ADF BC, you use wizards in JDeveloper to create:
  • Application Module
    • An application module is a service component that UI or Web Service clients use to work with application data. It defines an updatable data model and top-level procedures and functions (called service methods) for a logical unit of work related to an end-user task. To simplify the task of implementing your services, you leverage a set of business components like entity objects and view objects.
    • You can enable a service interface on any Application Module. The service interface expose Application Modules as remotable services allowing third-party applications to find, create, update and delete business information using standard web services protocols. All of the business validation rules encapsulated in your Entity Objects are automatically enforced through this service interface as well.
    • You can use any application module both as a local component and as remotely-accessible service. This allows you to support both interactive Web user interfaces as well as programmatic Web-service clients with the same component.
  • Entity object
    • An entity object represents a row in a database table and simplifies modifying its data by handling all DML operations for you. It can encapsulate business logic for the row to ensure your business rules are consistently enforced. You associate an entity object with others to reflect relationships in the underlying tables to create a layer of business domain objects to reuse in multiple applications.
  • View object
    • A view object represents a SQL query and simplifies working with its results. You declaratively join, project, filter, sort, and aggregate entity object data into exactly the "shape" required by the end-user task at hand, including the ability to link a view object with others to create master/detail hierarchies of any complexity. When users modify business data using a view object, that component automatically collaborates with entity objects to consistently validate and save the changes.
The following diagram illustrates the relationship among application module, entity object, and view object. A view object defines a query and produces a row set of rows. View objects and entity objects collaborate to enable an updatable data model. Application module contains view objects and it provides transaction.

ADF Business Component Service
ADF BC services are remotable services, typically coarse-grained and designed to be published remotely in a loosely coupled SOA architecture. It's easy to develop business services using ADF Business Components. JDeveloper allows you to publish application modules as web services which use SDOs ( Service Data Objects) to standardize the way that data structures are passed between Java and XML. JDeveloper also generates the WSDL service description that is used by the web service client in the consuming application.
When you use remote ADF Fusion Business Service, each remote call is stateless and the remote service does not participate in the same transaction as their composing parent application module. In the majority of the cases, calls to remote services will be informational in nature and will not be effecting changes to remote objects. However, if you must use a remote service to make changes then keep these points in mind:
  • An exception thrown by the remote service will cause the local transaction to fail.
  • However, the converse is not true.
In other words, if you successfully call a remote service that results in modifying data, and then subsequently your local transaction fails for any reason, then it is the responsibility of your error handling code to perform a compensating transaction against the remote service to "undo" the previous change made.
In this article, we will demonstrate how to create ADF BC services that exposes the top-level Employee View Object. Standard data manipulation operations on the Employee View Object including the following operations:
  • createEmpVO1
  • updateEmpVO1
  • deleteEmpVO1
  • getEmpVO1

Integrated WebLogic Server (WLS)
To run JDeveloper application in a Java EE container, it must be bound to a Server Instance. Integrated WebLogic Server (Integrated WLS) comes packaged with JDeveloper. You can run your applications directly on this server without the need to deploy. The integrated WLS is sufficient to run your application to make sure it displays correctly in browsers, or for testing and debugging portions of the application. However, real end-to-end testing should be done in a standalone WebLogic Server because that is what will be used in a production environment. For simplicity, our sample application will use Integrated WLS for deployment and testing.
JDeveloper is bundled with a WLS domain (i.e., "DefaultDomain"), and "DefaultServer" is defined for it. All JDeveloper applications are bound by default to "DefaultServer." In this document, these default settings are assumed. To view the properties of "DefaultServer" Server Instance, in the Resource Palette -> IDE Connections -> Application Server -> IntegratedWebLogicServer, right click and select "Properties...".
Prerequisites
This article assumes that you are familiar with
  • ADF
  • WSDL
  • JDeveloper
  • Web Services
and have access to a running JDeveloper and a running Oracle Database with EMP table in SCOTT schema. The resources section at the end provides you with pointers to documentation and tutorials.

Create Schema-Object-Based Entity Object

Step 1: Create a New Fusion Web Application (ADF)
  • Open the New Gallery wizard and choose Fusion Web Application (ADF) [File > New > General > Applications > Fusion Web Application (ADF)]
  • In the Create Fusion Web Application (ADF) wizard, specify your application name (e.g., EmployeeWS)
  • Click Finish.

Step 2: Create the Entity Object
To create a single entity object, you can use the Create Entity Object wizard, which is available in the New Gallery:
  • In the Application Navigator, select the Model project and open Create Entity Object wizard [File > New > Business Tier > ADF Business Components > Entity Object].
    • Because this is the first component you're creating in the project, the Initialize Business Components Project dialog appears to allow you to select a database connection.
    • Edit the Connection in the Initialize Business Components Project wizard by clicking on "pencil" icon. Note that you may need to change the Connection name if it's already being used.
    • Enter scott as username and tiger as password. We're going to use EMP table in SCOTT Schema for this example.
    • Click Test Connection to confirm that you can connect.
    • Click OK if the connection was successful.
    • Click OK to close Initialize Business Components Project wizard.
  • In the "Create Entity Object - Step 1 of 6", enter "EMP" as Schema Object. Click Next.

  • Click Next to skip "Create Entity Object - Step 2 of 6".
  • In the "Create Entity Object - Step 3 of 6", make "Empno" attribute a primary key by checking "Primary Key" box. Click Next.

  • Click Next to skip "Create Entity Object - Step 4 of 6".
  • In the "Create Entity Object - Step 5 of 6", check "Generate Default View Object" box. Then, check Application Module box. Click Next.

  • Click Finish.

Step 3: Generate SDO Class
Following the guidelines specified by the Open SOA [2] collaboration, the application module's web service uses Service Data Objects [6] to standardize the way that data structures are passed between Java and XML.
View objects are published in web services as SDOs. Follow the steps below to generate SDO classes for your view objects.
  • In the Application Navigator, double-click the EmpVO.
  • In the View Object Editor, select the Java tab.
  • In the Java page, click the Edit icon in the Java Classes section. The Edit icon resembles a pencil.
  • In the "Select Java Options" wizard, check "Generate Service Data Object Class" box. Click OK.

You should be able to see the following files are generated:
  • Emp.java
  • Emp.xsd
  • EmpImpl.java
Note that this step actually is optional. If you skip and proceed directly to step 4, JDeveloper will still generate those SDO files for you.

Step 4: Publish Application Module as Web Service
You can use any application module both as a local component and as remotely-accessible service. This allows you to support both interactive Web user interfaces as well as programmatic Web-service clients with the same component.
JDeveloper creates the web service implementation wrapper and other files required to expose the application module as a web service. If you make changes to your application module's declarative service interface settings, JDeveloper automatically keeps the related web service artifacts in sync.
You publish your application module as web service:
  • In the Application Navigator, double-click the AppModuleAM.
  • In the Application Module Editor, select Service Interface to open the Service Interface page.
  • In the Service Interface page, select the '+' sign to enable support for service interface.
  • Use the Create Service Interface wizard to configure the options you want.
  • On the Service Interface page of the wizard, click Next twice to skip step 1 and 2.
  • On the Service View Instances page, select Emp1 and shuttle it over to the Selected list, and enable Create, Update, Delete, and GetByKey in the Basic Operations section. Then click Finish.

You should be able to see the following files are generated under AppModuleAM->serviceInterface
  • AppModuleAMServiceImpl.java
  • AppModuleAMService.java
  • AppModuleAMService.wsdl
  • AppModuleAMService.xsd

Step 5: Test the Application Modlue in the Oracle Business Component Browser
You can test the application module in the Oracle Business Component Browser:
  • In the Application Navigator, right-click AppModuleAM and choose Run.
  • In the Oracle Business Component Browser, double-click EmpVO1.
  • Click ">" icon to navigate to the next record.
  • Jot down Empno (e.g., "7369") for the next step.

Step 6: Test ADF BC Service
You can test your service interface without deploying it by selecting the generated web service class in the Application Navigator and choosing Run on the right-mouse menu. JDeveloper starts the embedded WebLogic Server (WLS) instance, and then provides a built-in web service testing tool where you can enter sample data for any of the service methods and verify the result returned.
  • In the Application Navigator, right-click the AppModuleServiceImpl.java in the serviceInterface folder and select Run.
  • Select Target URL (i.e., http://localhost:7101/EmployeeWS-Model-context-root/AppModuleAMService) in the Running: DefaultServer Log view and click on it.
  • Test ADF BC Service using HTTP Analyzer.
  • On the HTTP Analyzer page, select AppModuleServiceSoapHttpPort.getEmp1 from the operation's pull-down list.
  • Enter a valid empno (e.g., "7369") and send the request.
References
  1. ADF Business Components
  2. Open SOA
  3. Oracle Application Development Framework
  4. Oracle Fusion Middleware Fusion Developer's Guide for Oracle Application Development Framework 11g Release 1 (11.1.1)
  5. Oracle JDeveloper
  6. Service Data Objects Home
  7. Web Services Description Language (WSDL) 1.1
  8. How to Create Oracle ADF BC Services (2)
  9. Open Source sample applications for Oracle Fusion Middleware technology

© Travel for Life Guide. All Rights Reserved.

Analytical Insights on Health, Culture, and Security.